ShopSite Quickstart Guide

ShopSite Quickstart Guide
Now that her store is built, Tina needs to configure some settings before she is ready to have customers come through it, dealing primarily with information needed to make the sale: tax, shipping, payment, and special instructions. She clicks on the button in the button bar marked "config".Sales Tax:
Tina's business is based in Sunshine County, California. Since her customers are most likely to be living outside of California (since most of the world's population does, in fact, live outside of California), in the first field on the sales tax page, Tina enters "I live outside California" and a sales tax rate of "0". In the next field she enters "I live in California" and 6.5 for the tax rate. Then, since her county has a slightly higher tax rate, she enters "I live in Sunshine County, California" in the third field, and a tax rate of 6.75. The customer will then be able to select the correct tax rate when checking out.Payment options:
For now, the only methods that Tina's Toys accepts for payment are Visa, Master Card, and American Exclick, so under this listing, she makes sure the rest are un-checked.Customize ordering system
Tina wants to customize the customer experience a bit, and she wants to make sure that she doesn't lose any orders just because people are skittish about ordering online. For the text at the top of the shopping cart page she gives some guidance to her customers regarding how to choose between different kinds of toys and how to use the system. The ordering instructions box is a field on the shopping cart page that customers can enter information into. She doesn't want it to appear, so she makes sure it's unchecked. For the top of the payment screen she types in "Remember, if you have any problems checking out, please e-mail tina@toys.com. If you do not want to order online, you can call 1-888-tina-toy. Please give us feedback on our site in the box below, and if you have any questions regarding your order, let us know." She then makes sure the "Create customer comments box" checkbox is checked. It will appear on the shipping screen, where the customer enters name, address and payment information. Tina leaves the Text at the top of the thank you screen and the text at the bottom of the e-mail receipt alone. She can change those later if she wants.Shipping Options
When she first gets to the shipping configuration page, Tina doesn't understand what the different shipping options mean, so she clicks on the question mark at the upper right of the page. There, she reads the explanations for each shipping method on the Shipping Help page and decides to go with "base plus" shipping, wherein she sets a minimum shipping charge of $3.00 and specifies a particular shipping charge associated with each item. For example, the siren machine costs $1.50 to ship, plus the $3.00 base charge, for a total of $4.50. A rubber ducky will add an additional $.50 to the order.The products that Tina has already entered do not have a shipping charge associated with them, so she uses the "power edit" feature to set it for each, exactly as she did when she specified a graphic for each product and page. If you don't remember how to use power edit, click here to review. Depending on which shipping option is selected, there may be no field in the products section to enter a shipping cost. That field appears automatically now that she has specified "base plus" for her shipping method. If she chose "shipping by weight", a weight field would appear for each product.
Universals
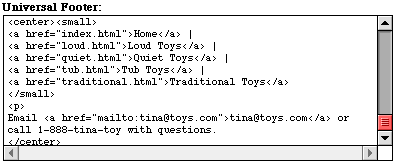
Tina would like to display a universal footer in her site, that is, text that appears identically at the bottom of every page. She takes this opportunity to learn a little HTML. She reads the ShopSite guide to HTML and learns how to make a link, so she decides that there should be a link to the main pages of her store in the footer, as well as her e-mail address and phone number. She enters the following into the text box:

and the text comes out looking like this, with the red and blue text being hotlinks:

Your E-mail Address
Before you open your store for customers, be sure you have set your correct e-mail address in the "Technical Settings" section. Unless you know what you're doing do not change any other information. The e-mail address that you should enter here is the address that you would like the e-mail notifications of orders to go to. If you have separate sales and customer support addresses, they should be displayed in your site, but do not need to be entered here.