Click here for more information on installing ShopSite. |
Welcome to the ShopSite Quickstart guide. Whether you have recently purchased ShopSite or are considering the purchase, this guide will take you through the steps of setting up a store. Please read this document carefully--it will help you save precious time in setting up and maintaining your Web site. Rather than printing out this document, please try to read it online. It contains graphics and hypertext links, allowing you to look up more information about specific terms and concepts discussed in this document by clicking on the highlighted word. Setting up a new ShopSite store is easy and fast. Once you have the software installed on your own server or virtual server, you can set up an online store easily using only a Web browser (like Netscape). We've tried to make the ShopSite interface very intuitive, so it is theoretically possible to plunge right in and start building, but we've developed this resource to walk you through the hard parts and eliminate the trial and error process. It will take you through the creation of a hypothetical store. |
| In our online Help Resources, you will find a searchable help archive, a introduction for new users, and links to resources on HTML, graphics, and marketing. There are also answers to some common questions regarding ShopSite software. Please refer to these resources before sending e-mailing or calling anyone for technical support. | |
|
Click here for more information on hosting services. |
This guide is divided into these sections:
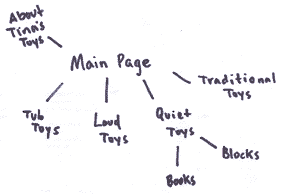
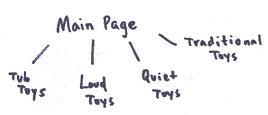
Tina Tortellini is the owner of Tina's Toys, a small toy shop. After listening to the success stories from her brother, Bruno (of Bruno's Bakery), she's ready to move into a global marketplace. She has run a successful mail order business for several years, but the cost and effort of maintaining a mailing list and printing a catalog eats into her profits. She already knows what marketing strategies have worked and thinks it will benefit her in the long run to use the same techniques to sell her wares online. She is also ready to experiment with new strategies that will take advantage of the Internet's strengths: the ability to make frequent changes to her store's appearance and content, the power of online advertising, and maintaining regular contact with her customers via e-mail. Pre-Assessment and Organization After contacting an hosting provider and having the ShopSite software installed on a virtual server, Tina sits down and organizes (on paper - the old fashioned way) her products. She puts them into logical categories, which will be divided into separate pages. After much consternation and thought, she chooses four: |
|
|
|
Click here for more information on hiring a designer. |
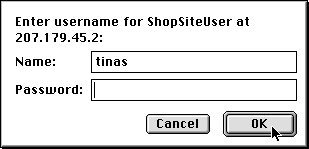
Tina then decides which products fall into which category. She thinks out descriptions and chooses prices for each product; she collects pictures of each one and has them scanned and converted into gif format by a local graphic designer, who also designs a logo, some letterhead, and a business card. Though she could have saved money by preparing her images herself, Tina chooses to let a professional do the work, because she does not have much experience editing images and does not own a scanner. Rather than pay the copy shop high hourly rates for scanning and then have to purchase and learn to use new software, she leaves it up to a professional. The graphic designer consulted with her, created the images, and gave them to her on disk. This much preparation might seem like overkill, but since time is money, there's no use going back over and over to re-do something when you can get it right the first time with a little preparation. When she contracted with a hosting provider for a virtual server and installation of ShopSite software, her host service gave her a directory called "tinas". Since the server's URL (Internet address) is "www.host.com", Tina's URL is http://www.host.com/tinas. Actually, her store's main page is at http://www.host.com/tinas/index.html, but any page named "index.html" will load up by default if no page is specified. Therefore, shortly after her provider installed the software, he sent her e-mail telling her that her store's URL would be http://www.host.com/tinas and her back office URL would be http://www.host.com/cgi-bin/bo/start.cgi. She made bookmarks for both URLs. In fact, since she knew that she would be accessing the back office every day, she set that URL as her home page in Netscape Navigator. When she goes to the back office URL, nothing loads up. Instead, a small window appears and asks her for a name and password. Before she had the software installed, she told her provider that she wanted her name to be "tinas" and her password to be "toys4me2". She enters those in the fields provided and enters the back office of her store.
The first thing that Tina does, since this is the first time that she has ever been in the back office of her store, is look around. She takes a few minutes to see where things are, and makes sure that she knows how things work. With the button bar at the top, navigation is easy. She can reach each main page from any other page in the back office. And since clicking on the question mark in any page takes her to a help page, she feels confident enough to begin. |
 |
|
|
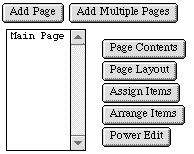
Now that she has everything together, Tina's going to begin building her store. Starting at the back office main menu, she clicks on "Pages". She finds that one page has already been created, the home page for her store. This will be the page named "index.html", the one that loads up by default. She selects "main page" by clicking on it, and hits the "page contents" button. A new page comes up containing spaces (fields), some blank, some filled, where information about the page can be entered and changed.
Under "Name" she highlights "main page" and replaces it with the name of her store, Tina's Toys. If she had already uploaded her graphics, she could choose her logo from the pull-down menu, but since her graphics are not uploaded yet, she will add them later. We'll cover uploading image files later in this guide.
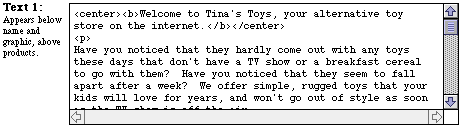
In the "Text 1" section, she enters the description of her store that she would like people to see first. She tells the customer about her shop, the kinds of things she sells, and perhaps about any specials she might be having right then. Since Tina makes the changes herself, she has no limit to how often she makes changes to this text. She could give anecdotes about her children and their favorite toys: devoting each day to a different child. It encourages many online customers to return often when a store is updated regularly. And Tina is making a wise choice by choosing a personal touch. It fits well with what she's selling and will help customers identify with her.
Tina doesn't know much about HTML, but she learned from the ShopSite Introduction to HTML that if she puts a <p> tag between sentences it skips a line, and a <br> tag will start a new line without skipping a line. She even put some text between the <center> and </center> tags to center it. |
|
|
Click here to find out about using HTML editor software with ShopSite. |
You do not need to use any HTML tags to use the ShopSite system, but we would suggest using at least the <p> and the <br> tags so that your paragraphs do not look crammed together. Remember that if you hit return at the end of the line, your Web document will not display it as such. You must use the <br> tag. If you know a lot about Web design, you can put as much text and html into a ShopSite text field as you want. You can even lay out a whole page using your favorite html editor, and cut and paste the body of it into your ShopSite document. Tina chooses not to enter anything into the Text 2 and Text 3 areas, because she wants the links to her other pages to appear under her welcome text, and she intends to make a universal footer later on containing her address, phone number and e-mail address, which will appear at the bottom of every page in her site. We'll discuss making a universal footer later in this document. For the front page, Tina leaves the "link info" section blank. If she wanted to make every page in her site link back to the main page, one way she could do that would be to write "back to main page" in the "link name" field or create a graphic that said "main page" (or had a picture of a home) and specify it as "link graphic". If she did that, then whatever she entered in this page would appear on whatever pages she selected under "link location". At this point, there are no pages listed under link location, except the main page, because she hasn't created any yet. We'll discuss making links in the next section. Under "file name" Tina sees that "index.html" is already written there. She leaves it alone. Remember, the page called "index.html" loads by default if no page is specified. Once she is done editing the page, Tina saves her changes by clicking the "OK" button at the bottom of the page. Now Tina wants to see the changes she has made, so she clicks on the "Update" button in the button bar. Update takes the new information in her database and generates a new HTML page. She then clicks on "My Store" and takes a look at what she's done. After setting up her main page, Tina moves on to create the rest of her pages, clicking on the "Add multiple pages" button. She could add the pages individually, which would bring up a page that looked exactly like the one she just used to make changes to her main page, but she's going to save some time by making four at once. Under "Number of pages to add" she enters "4", and then decides which fields she wants to add information for. Holding down the "control" button on her keyboard (it might be the alt, shift, or command button, depending on the system you're using) she clicks on the "name", "text 1", "link name", "link text", "link location" and "file name" fields, highlighting them. After clicking on the OK button, a page is generated which contain the fields she selected for four products. "What a time saver!," Tina exclaims. The "link info", "link text"
and "link location" are fields that Tina did not need
to fill out for her main page, because it is the launch pad for
the rest of her site, but she will need to fill in that information
for every other page. Before she started, Tina made a map of
her site. She decided how many pages she would be making and
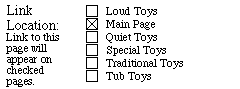
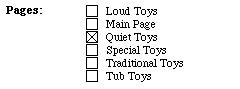
which would link to which: Tub toys, loud toys, quiet toys, and traditional toys are the first four pages that she will create. They will all be linked to the main page and some of them will have other pages linked to them. Using the "add multiple pages" window that she created, Tina enters the name of each page and a description, an introduction to the items she will be displaying on the page. She then repeats the name of the page in the "link name" field, and writes a short description of the page. For "link location" she selects "main page".
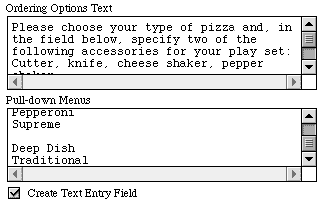
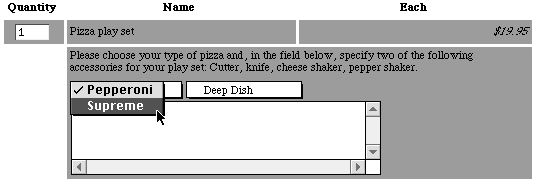
For file name, Tina selects a simple name that makes sense to her. For "tub toys", she chooses "tub.html". The file name must end in .html or .htm or a Web browser will not read it. If she decides not to choose a file name, her pages will be named "page1.html", "page2.html", etc. After setting up her first four pages, she repeats the process with the other five pages. When setting up the "blocks" page she remembers to link it to the "quiet toys" page, not to the main page. After finishing with her pages, Tina clicks on the "products" button in the menu bar at the top of the page. It takes her to a screen that looks just like the pages screen she just left, but this one is for her store's products. Though Tina could add multiple products just like she added four pages at once, she decides to add one product just to see how it works. She chooses the pizza play set, which will be listed under "quiet toys". She hits the "add product" button, fills in name and price, but decides to wait to decide on shipping prices until later, so she leaves the shipping fields blank. She does not track her products by SKU, so she leaves that field blank as well. She skips the "graphic" section too, since she will be adding graphics later. She fills in the description, and then comes to the "ordering options" section. Ordering options allows the customer to make choices regarding color, size, or customization of a particular product. The customer will be given these choices while in the shopping cart section, which means that they will not see these options until after they hit the order button. (Note: Ordering options only works if the options do not change the price of the item. If different sizes are different prices, for example, each price point will have to be entered in the database separately.) Tina writes the following in the "options text" window: "please choose your type of pizza and in the box below, type in your choice of two of the following accessories for your pizza play set: cutter, knife, cheese shaker, pepper shaker." Checking the "create options box" checkbox creates a text field where the customer can type in requested information.
Under "finite options" Tina enters "supreme" and "pepperoni", skips a space and enters "thin crust" and "deep dish". This will create pull-down menus that allow the purchaser to choose between the different options for the item in the shopping cart page. Skipping the space starts a new pull-down menu. There can be an almost unlimited number of choices in each menu, and an almost unlimited number of menus. |
|
|
|
|
At the "Assign to Page:" section, Tina checks the "Quiet Toys" box. Now, the pizza play set will appear on the Quiet Toys page, along with any other products assigned to that page. Tina can also assign other pages to the Quiet Toys page. Remember that, according to her diagram, she assigned a Books and a Blocks page to the Quiet Toys page too.
Some products will fit into many categories. Her wonderful Rubber Ducky, for instance, fits in both the "Tub Toys" and "Traditional Toys" aisle. The Teddy Bear, too, fits in multiple aisles. Tina puts Ted in "Quiet Toys" and "Traditional Toys." Not all toys have such a wide application, Scuba Man fits only in "Tub Toys" and Siren Machine is clearly a "Loud Toys" candidate. Clicking on the "create more information page" checkbox will generate an entire page dedicated to that particular product. The name and graphic for the product becomes a hotlink, so when the customer clicks on it, a new page comes up with additional information about the product and another graphic. Tina has so much to say about the pizza play set that if she said it all in the standard product description it would take up the whole Quiet Toys page, so in addition to the small product description she already entered at the top of the page, she writes several paragraphs on the more info page. She also uses a small graphic to go with the small description, and a larger graphic on the more info page, which shows more detail. This technique is known as a thumbnail image. She names the more info page "pizza.html." |
|
|
Click here to learn about the database upload feature. |
If you want to transfer the product data from an existing business without having to key in every product, or if you have so many products that you would be more comfortable working with a spreadsheet or other consumer database software, you can upload the database to your ShopSite store in tab-delimited format. In fact, you can upload text and formatting information for your pages in this manner also. Both the "products" and "pages" screens have a "database upload" button, which walks you through the process. Tina decides that she wants to lay out the information on her main page so it stands out from her other pages, so at the "pages" menu, she selects her main page from the list and hits the "page layout" button. Since the banner graphic she is going to upload contains her store's logo and name, she does not want the name to appear in plain text underneath, so she unchecks the "display name?" box. She sets the page width to "90%", which will make margins on both sides of the page. Tina doesn't know what all the features in the page layout section do, so she leaves them in their default settings. By clicking on the question mark, she can learn all about each item on the page. She changes the background and text colors so they will match the artwork, and hits the "assign items" button. A word about the buttons at the bottom of the page: At the bottom of the "page layout" page, like most pages, is a bank of buttons. The "ok" button will save the changes she has made and return her to the menu. The cancel button will return her to the menu without saving any changes. The other buttons are shortcuts. They will save her changes and jump to another page, bypassing the menu page. So, hitting the "assign items" page at the bottom of the "page layout" page is the same as hitting the "ok" button, selecting the main page from the list again, and hitting the "assign items" page. The "assign items" page prompts Tina to choose which types of items she would like to assign to the page. Links to other pages can be interspersed with products, and tina had already assigned each of her primary pages, "loud toys", quiet toys" etc., to the main page, but above those she wants to have her featured product of the month appear, the siren machine. When she added the product to her products database, she assigned it to the "loud toys" page, but now she also wants it to appear on her main page. So, at the "assign items" menu, she selects "products" and hits "ok". That generates a list of all her products with a check box next to each one. Every product that she checks will appear on that page. She checks the "siren machine" box, and hits the "arrange items" button which, remember, is the same as hitting the "ok" button, but it jumps her to the page she wants to be on. She wants to be on the "arrange items" page because she sees that items on a page are listed top to bottom in the order in which they are created. "Arrange items" lets her decide what order they will be in. It brings up a menu of all the items on the page, and she can choose which she wants to appear in each slot. She puts the product at the top and the pages underneath. Be careful, you need to make sure none of them are listed twice. If that happens, you will get an error instructing you to go back and check to make sure each item is listed only once. Tina then hits the "page contents" button, because she decides that she ought to introduce her product of the week, the siren machine, rather than just plop it on her front page with no fanfare. So, in the "text 1" field, under her other text, she puts a <p> tag in to skip a line and then tells her customers that she will be highlighting a new product each week, and tells a little about the new siren machine. With ShopSite, it is easy for her to change that product and text every week, and it encourages her customers to come back often. Now that Tina has the basic structure of her store set up, she is going to upload and place her graphics. She selects "media" from the button bar, which brings her to the media manager. For uploading she has two options. If she is using Netscape Navigator 2.0 or higher, she can upload graphics directly through the media section of the back office. Hitting the "upload image" button will take her to a new page where she will see a button marked "browse". The browse button will bring up a window allowing her to find where she has the images stored on her hard drive. She will have to select them one at a time, each time having the opportunity to rename the file. |
|
Click here to learn more about FTPing. |
Since Tina is using Microsoft Internet Explorer, she will need to ftp the images to the server. Even if she were using Netscape, she would probably want to ftp them anyway, because that way she can upload them all at once. The media manager page displays the path to the directory where images are stored, and Tina's provider told her the username and password she needs, all of which she saves into her FTP software. The ftp software is shareware that she received from her Internet service provider. She then follows her software's instructions to upload her image files from her hard drive to her virtual server. If you have a lot of files, you may want to give them long, descriptive names. Remember to separate words with periods, underscore characters or hyphens. You can't have spaces in the filenames. Also remember to put a .gif or .jpg suffix at the end of each file name. For more information, see the graphics guide. Tina might have saved some time and hassle if she'd added images first. That would allow her to visit each page and product creation page only once. Now, because she waited, she'll have to go back and add the images to the existing products. However, this gives her the chance to use the time-saving "power edit" feature. In the "pages" section, Tina selects the pages she has graphics for by holding the control button and clicking on the names in the list, then she clicks on the "power edit" button. She then sees a list of the fields she can select to edit. This is the same list she saw when she added several new pages at once. The only field she wants to edit this time is the "graphic" field, so she selects it and hits "ok". This generates a page containing the name of each page she selected and a pull-down menu to choose an image file. She picks the correct image for each page and hits ok. She repeats the process for her products, specifying an image for each. Note: it is easy to add images anywhere on the page-- even
when there's no pull-down menu to choose. By simply adding an
HTML tag into your text where ever
you'd like the graphic to be, your store can look much more professional.
Try typing
Now that her store is built, Tina needs to configure some settings before it is ready to have customers come through it, dealing primarily with information needed to make the sale: tax, shipping, payment, and special instructions. She clicks on the button in the button bar marked "config". Sales Tax: Payment Types: Customize ordering system Shipping Options The products that Tina has already entered do not have a shipping charge associated with them, so she uses the "power edit" feature to set it for each, exactly as she did when she specified a graphic for each product and page. If you don't remember how to use power edit, click here to review. Depending on which shipping option is selected, there may be no field in the products section to enter a shipping cost. That field appears automatically now that she has specified "base plus" for her shipping method. If she chose "shipping by weight", a weight field would appear for each product. Universal Header/Footer
and the text comes out looking like this, with the red and blue text being hotlinks:
Your E-mail Address |
|
You must register your store online to receive tech support. |
After finishing the construction of her store, Tina goes to the Utilities section of the back office and clicks on the "Register Store" button. She provides information about her Web site and contact information which helps her service provider in the event that she needs technical assistance. Registering also makes her eligible for inclusion in the ShopSite Marketplace, a popular online mall that showcases hundreds of stores that use ShopSite software. Inclusion in the marketplace gives Tina the opportunity to immediately get some people into her site once it's open, but it's just a start.
After building her store, Tina visits the ShopSite Help page and reads a document called Promoting Your Site. It's a to-do-list for new online merchants which guides her, step-by-step, through marketing her products online. In it, she learns how to list her site with search engines and Internet directories for free, learns how to ask the owners of Web sites to make links to her site, and gets some tips on Internet advertising. Doing a little research, she discovers that there's a very popular Web site called Toy Town which highlights and reviews new toys. They have a links page that lists toy related Web sites, so Tina writes to the Webmaster there: Hello, my name is Tina Tortellini and I absolutely love your Web site. I just discovered it today. I took your classic toys trivia quiz. I'm exploring the net today primarily because I just opened a new online store, Tina's Toys, and I'm trying to get the word out. Could you please add me to your links list? Also, I noticed you accept advertising. Please send me your rates, and give me an idea how many impressions per day my ad can expect. Thanks, Tina. Later that day Tina receives e-mail telling her that she would be added to the links page and that she could advertise on the front page for $350 per month or on the "hot new toys" page for $150. The new toys page gets 6000 accesses per month while the front page gets 15,000. However, Tina decides that the people who visit the Hot New Toys page are more likely to buy her products anyway, so she calculates an approximate cost per thousand impressions for the ad space (also known as CPM, the standard measurement for Web advertising) and it comes out to $25 CPM, which is a reasonable rate. Nevertheless, she decides to go for a month or so without paying for advertising, and she arranges for several more free links, spending two or three hours a day browsing the Web, e-mailing Webmasters, posting to the alt.toys.forsale newsgoup, and corresponding with her customers. Her traffic slowly climbs, but after she decides to pay for a trial month running the ad her traffic doubles overnight. At first, people mostly just look and don't buy, but then, as they return to the site later, which they bookmarked, the orders start coming in. When an order is made, Tina receives an e-mail message alerting her to the order. However, the message does not contain payment information. Since e-mail is not a secure medium, payment information can be viewed on a secure Web page accessible through the back office. In the button bar, Tina notices that after running a test order through, that the "order" button is underlined, flashing, to notify her that there are orders waiting to be viewed. He clicks on the "orders" button and sees that orders which have not been viewed are marked with an asterisk on the orders page. The order information can be viewed and then printed out from the browser window, but Tina prefers to open her accounting software side by side with her Web browser and copy the information from one window to another. Every few weeks, she selects all the orders, views them all, and then saves the page as a text file, so she can have a record of her orders. She then deletes them all from ShopSite and stores the file on her hard drive. How many people came and looked without buying? Tina wonders. She can find out by going to her statistics page. Right now, ShopSite Manager displays statistics on sales and traffic, giving basic information concerning how many sales were made, how many units were moved, and the total dollar amount. Also, it records "hits", or the number of documents (images and text files) retrieved by visitors, plus the number of pages visited, and the number of unique hosts, or individuals, that visited your site. This information is logged for each day, for the month, and for the year. ShopSite Pro will have dramatically expanded statistics, including tracking referrers, or the pages that your visitors came from, in order to track your links and ads on other sites, as well as telling you which pages each visitor saw in your site. There are also a number of customization options available which we have not covered in this quickstart. Learning more about Web design by reading online tutorials, taking a class, or buying books can be a good start. The real key is practice and hard work. Some people just don't have the time and should consider hiring professionals. The online help resources explain every feature in detail, and the way to start is to click on the little question mark next to any button you don't recognize. This context-sensitive help can be a launch pad for your exploration into ShopSite's features. Having a successful business of any kind takes time and dedication. The Internet makes many aspects of running a business easier, but it does not replace hard work. ShopSite exists to eliminate a great deal of the work involved in building and maintaining a dynamic, lively, successful online store, and the more you learn about the software, the more you will be able to customize your site so that it looks the way you want. After reading this document, we suggest reading the rest of the documents in the ShopSite Help archive. |
If you are not finding the help you need, please give detailed feedback.