Add Product
This feature creates a new product record for your site and prompts you for the information required to fill it. If you have already created the page or pages that you would like your product to appear on, you can assign the product to the page here. Otherwise, you can wait until later and use the assign items feature in the "products" section.
Product Name - This is both the name of the product that will appear wherever the product is displayed, and also the name of the record in the database (the list of products). Even if you do not want the name of the product to appear in your site, you must give it a name here. See below to choose which fields to display on your pages.
Price - This is the price that will be displayed in your site, but it is also used to calculate order totals. Even if you do not want the price of the product to appear in your site, you must enter it here. See below to choose which fields to display on your pages. The currency symbol can be changed in the international settings section of the back office, under config. The dollar sign ($) is the default currency.
Taxable - If sales tax can be charged on this item, mark it "taxable" here. Sales tax for your area can be set in the Sales Tax section, under config.
Weight
If you have shipping by weight selected as your
shipping option, under the config menu, then you must enter the weight for your product
will appear here so that shipping costs can be calculated.
Per-product Shipping
If you have any of the per-product shipping options selected in the shipping options, a field will appear here for a
per-product shipping charge for each shipping method you have chosen. Enter the price to
ship that product for each of the shipping methods you have specified.
SKU - SKU stands for "Stock Keeping Unit". It is a string (a combination of number, letters, or both) that merchants use to track their items. If you track your merchandise by SKU, code name, or any other string, you can enter it in this field. By default, this string will not be displayed in the site (though you can choose to do so below), but it will appear when the item is ordered to make fulfillment easier.
Product Graphic - This is the image that will appear next to (or above) the product information. All files in your media library will appear in this pull-down menu. If you would like to create a thumbnail graphic, that is, if you would like to display a smaller image, that, when clicked on, leads to a larger one, select your small graphic here and use the create more information page feature to display the large one. Use the radio button to select the method for finding your image.
Product Description - If you would like to provide information about the product add it here. You can also put HTML tags into this field for ultimate customization. for example, if you would like to format product data into a table, you have that capability. If you would like to enter little or no text here but provide more full information on a separate page, use the create more information page feature.
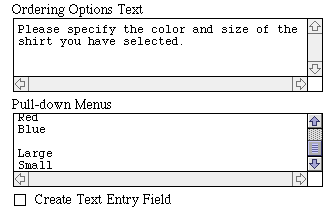
Ordering Options - If you choose to have ordering options, the text you enter here will appear on the shopping cart page after the customer has ordered the item. You can instruct the customer to make choices from pull-down menus or to enter information into a text entry field.
The pull down menus field (also called "Finite Options") is for you to specify options that will appear in a pull down menu for customers to select. If the product is a shirt which comes in two sizes and two colors, you would specify the finite options as shown below, skipping a line between groups.
Note: For non-Pro stores, ordering options only applies if the options do not change the price of the item. If different sizes are different prices, for example, each price point will have to be entered in the database separately. Pro stores can use ordering options to change the price. To learn more about using this feature, see the ordering options guide.
Display product on checked pages - Every page you have created so far will appear in a list here. Check the box next to the name of each page where you would like this product to appear. If you have not created a page yet, but you would like to assign this product to it in the future, you can also use the assign items feature in the pages section.
More information page
If you check the box to create a more information page, the name and image for your
product become a hotlink that leads the shopper to a separate page containing additional
information. A more info page is perfect for displaying a larger image or a long block of
text which would look unattractive or make the page load too slowly if it were on the
regular product page. See the more info page documentation
for a detailed description of the features.
Product Template - There are several templates that determine how product information will be displayed on the pages. For a detailed description of these templates, see the product templates guide.
Display - Here you can choose which product information you would like to display on the page. By default, name, price, graphic, and order button are all displayed, and SKU is recorded but not displayed. If you are using the more information page feature, it can be effective to display only the product name and/or graphic, and display the rest of the information on the more info page.
Style/Size - The name, price, SKU, and description, can all be displayed in different styles and sizes. Choose between plain, bold, italic, and typewriter styles, and between small, normal, and large sizes for each.
Image Alignment - For advanced users, product images can be displayed aligned to the center or to the right, in addition to the default left alignment.
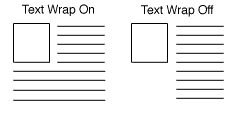
Text Wrap - If this option is set to "on", text will wrap around under images. Otherwise, it will continue in a straight column You only need to set this option if your product description contains a lot of text.

Note: The following options are only available if you are using ShopSite SC Pro.
Order Button - Use this field to customize the order button for an individual product. For example, you can replace the text with an "Order now at Reduced Price" image. You can also change the button text or remove the order button for this product entirely. To remove the button, simply make this field empty.
Checkout Button - Use this field to customize the checkout button for an individual product. For example, you can replace the text with an image of a cash register. You can also change the button text or remove the checkout button for this product entirely. To remove the button, simply make this field empty.
If you are not finding the help you need, please give detailed feedback.
