

| Using ShopSite® Order Transfer 3.0 | ||
|---|---|---|
| < Prev | Next > | |
After installing and configuring Order Transfer, you can begin importing your ShopSite orders into QuickBooks.
Subtopics
There are various ways in which you can begin a QuickBooks session in Order Transfer:
When you are finished working with a company file in Order Transfer and want to end the session, click"Close Session" or simply exit Order Transfer. If you remain in Order Transfer, you can click "Open Session" to begin a new session with another company file.
Before orders can be imported into QuickBooks, they must first be downloaded to Order Transfer. There are two methods you can use to download orders in your ShopSite store:
The automatic download requires that you set up a connection to your ShopSite store. Even though this is the most convenient method for importing orders, there may be circumstances in which a connection to your ShopSite store will not work. In this case you must download the orders manually instead.
The manual download requires that you go into the ShopSite Backoffice and select the orders you want downloaded. The download format must be XML, and all fields should be included.
Even if you can use the automatic download, the manual download can be handy at times. For example, you can manually download a large group of orders at one time and then use the same download file multiple times as you import just the orders you want and when you want them. You won't have to go back to the server multiple times for just a few orders.
The choice of ranges are:
The default is to download all orders, which is fine if you manage your orders so that a large number of old ones aren't downloaded each time.
Order Transfer keeps track of the last order number downloaded, so if you choose to have only new orders downloaded, Order Transfer will begin with the first order number that occurs after the last one.
The date range and number range choices allow you to download only the orders that are within the specified range of order dates or order numbers, including those at the beginning and ending points.
You can also specify just one date or one number as the beginning or ending point of the range. To use just the beginning date, uncheck the box for the ending date, and to use just the ending date, uncheck the box for the beginning date. Similarly for the number range, clear the edit field for the end point that is not to be used.
A beginning number or date will download all orders from the starting point to the last order in the database. An ending number or date will download all orders from the first order in the database up to and including the ending point.
Other import options include:
When orders are imported into QuickBooks, a sales transaction must be created for each one. The transaction types supported in Order Transfer are Invoice, Sales Receipt, and Sales Order.* If the majority of your orders should be imported as one of these transaction types, you can check the box for this option and select the transaction type to use. Prior to importing you will have a chance to review the orders and change the transaction type for individual orders as needed.
Also when you review orders, you can choose which ones to import and which ones not to import. If you want all orders initially marked for importing, then check the box for this option.
Order Transfer creates a log of the orders imported. By default it starts a new log when you import a new group of orders. If you want to keep a record of past imports, check the box to keep the contents of previously imported orders.
* The Sales Order transaction type is available only in Premier and Enterprise editions of QuickBooks. To enable use of the Sales Order transaction type in Order Transfer, go to Preferences > Transactions 2.
The window to review orders appears when you click the button on the main Order Transfer screen. In this window you will see a list of the orders ready for importing. If you specified an order range, only the orders within that range are listed.
There is a checkbox for each order that you can check if you want the order imported and uncheck if you don't want it imported. For convenience there is a button to check all orders in the list and a button to uncheck all orders in the list.
The button will display another window in which you can view order details. If no orders are checked or all of them are checked, you will be able to view the details for each order one by one. If some orders are checked and some are not, only the checked orders will be viewable.
The View Orders window displays order details including customer name, company name, billing address, shipping address, order items, and payment information. If needed, you can view the XML coding for the order by clicking the button.
The transaction type selected for an order, if any, is shown in the dropdown menu at the bottom of the window. If no transaction type is selected, you can select it here, or you can change it if needed. There is also a checkbox you can check to import the order as the selected transaction type or uncheck if you don't want the order imported.
The and buttons sequence through the list of viewable orders one by one. When all order details go blank, that signifies you have reached the end of the list, either forward or backward.
The button closes the window and takes you back to the review window. If you made any changes to transaction type or import status while viewing order details, the review list will be updated with your changes.
The button begins the importing process for the selected orders. During the import process, you may get pop-up windows asking for additional information or to match up or add customers and items.
When Order Transfer is importing ShopSite orders, it must find the customer records in QuickBooks to use for the sales transactions it creates. To find a matching customer record for an order, Order Transfer compares the QuickBooks customer name with either the customer name or the company name in the order. The ShopSite name used for the comparison is the same name that is used when adding a new customer record, which is specified in Order Transfer Preferences [Customers 1].
When a matching QuickBooks customer is not found for a ShopSite order, you can specify in the same Preferences page whether to add a new customer record automatically or to display a pop-up window in which you can select a QuickBooks customer to use for the order.
Assuming the latter option is chosen and a matching QuickBooks customer is not found for an order, the pop-up window that appears will contain customer information from the ShopSite order followed by a list of QuickBooks customers that you can look through to find a customer record to match with it.
However, the first entry in the list is not an existing QuickBooks customer but is there for adding a new customer if needed. The information for the new customer comes from the ShopSite order. The suggested reference name can be edited, if desired, by right-clicking or double-clicking it.
Customer matches can be managed in Order Transfer by selecting "Customer Matches..." in the File menu. Here you can remove customer matches that are no longer needed or that were done incorrectly.
Since a company file may contain a large number of customers, the customer query is structured to return only a small number of results at a time to avoid slow responses in the user interface. The maximum number of results to return can be selected in the Max. dropdown menu. The built-in numbers are 10, 20, 30, 50 and 100. You can add your own number to this menu if you wish.
As you scroll through the current list of results and come to the end, you can click to add the next set of query results to the list, or to add the remainder of the query results to the list.
To narrow the search for a possible customer match, you can submit a query to find customer records where the customer name contains, begins with, or ends with a search term you enter. You can do the same thing for the company name, E-mail address, billing address or shipping address. Additionally, you can set the scope of the query to return results for all customers, active customers only, or inactive customers only.
If you want to see only customers whose names begin with an alphabetic letter, the button will first display a pop-up window for you to pick the letter you want and then run the query.
While a query you have run is still active, the search button* is changed to an 'X' and the query fields for entering search criteria are disabled. If you want to run another query, just click the search button to clear and reset the current query.
*
While importing an order from ShopSite, Order Transfer must find a QuickBooks item to use in the sales transaction for each ShopSite product in the order. When one is not found, a new QuickBooks item must be added for the product or an existing item selected for it.
ShopSite products can be linked to QuickBooks items either implicitly or explicity. An implicit link is when a QuickBooks item name matches either the ShopSite product name or SKU. An explicit link is when they differ.
There are two ways in which explicit links are created:
When searching for items to be used for ShopSite products, explicit links are looked for first and then implicit links. If neither of these are found for a product, Order Transfer can either add a new item for the product automatically or display a pop-up window in which you can examine the product information and decide whether to add a new item or pick an existing item to use instead. The method you prefer can be selected in Preferences [Items 1].
The pop-up window method displays a list of QuickBooks items to choose from. There are query capabilities available to make it easier for you to find a particualar item (see "How the item query works"). After you select the item and click OK, you will be returned to the previous window where you can continue the importing process. Note that if you selected an item for the product rather than adding a new one, this creates an explicit link.
Product matches to QuickBooks items can be managed in Order Transfer by selecting "Product Matches..." in the File menu. Here you can remove product matches that are no longer needed or are incorrect, and you can upload product matches to ShopSite where they will be stored in the products database. After uploading, you can remove the product matches stored locally.
Uploading product matches to ShopSite is important if you use data syncing from QuickBooks to ShopSite, because the product matches link QuickBooks items to ShopSite products so that they can be updated from the QuickBooks item information.
* To link a product to a QuickBooks item in the ShopSite Backoffice, QuickBooks item names must first be uploaded to ShopSite. This is done by selecting "Upload QuickBooks Item Names..." in the Order Transfer File menu. In the pop-up window select a ShopSite connection and then click Proceed. After item names are uploaded, you can select the QuickBooks item that the product you are adding or editing should be linked to. This is also a good place to check if a product is not being updated as expected when you upload data exported from QuickBooks.
Since a company file may contain a large number of items, the item query is structured to return only a small number of results at a time to avoid slow responses in the user interface. The maximum number of results to return can be selected in the Max. dropdown menu. The built-in numbers are 10, 20, 30, 50 and 100. You can add your own number to this menu if you wish.
To add more items to the list click . To add the remainder of the items to the list, click .
To list specific items, you can submit a query to find items where the item name contains, begins with, or ends with a search term you enter. You can do the same thing for item description. Additionally, you can set the scope of the query to return results by item type for all items, active items only, or inactive items only.
If you want to see only items with names that begin with an alphabetic letter, the button will first display a pop-up window for you to pick the letter you want and then run the query.
While a query you have run is still active, the search button* is changed to an 'X' and the query fields for entering search criteria are disabled. If you want to run another query, just click the search button to clear and reset the current query.
Sorting the list: Items are not automatically sorted as they are added to the list. You can have the items sorted at any time by clicking one of the column headers. The list will then be sorted alphabetically by column.
Item totals: The first item total is the current number of items in the list. The second item total depends on the currently active query. If it is a general query, and not a search for specific items, the results of the query will include all items in the company file, including those such as sales tax items. In this case the second item total is the number of items in the company file. If the query results are from a search, the second item total is the number of items that matched the search criteria. As items from a general query are listed, however, some items such as sales tax items will be omitted. When there are no remaining items in the query, the second item total will change to the number of items in the list to signify that the end of the query has been reached.
*
In QuickBooks you can customize the forms you use for invoices, sales receipts and sales orders. You can add or remove fields in the header (the top of the form), and also add or remove columns for the line items.
Order Transfer works in conjunction with QuickBooks form customization allowing you to display alternate information in some of the header fields. For example, if you have ShopSite order information that you want to appear in the header but there is not a field already provided for it, you can pick an unused header field and have Order Transfer display the information you want in that field. You can also change the title of the field in QuickBooks to identify the alternate information it now displays.
QuickBooks provides additional customizable fields named "Other", "Other 1" and "Other 2" that you can add to the form and use for ShopSite order information. The first one is for the header and the other two are for columns.
The following table lists the header fields and column fields that can be assigned data values from ShopSite order information. Note the maximum number of characters that each field can hold, and the transaction types that the fields can appear in.
| Field Name | Field Type | Max Chars | Invoice | Sales Receipt | Sales Order |
|---|---|---|---|---|---|
| P.O. No. | Header | 25 | Yes | No | Yes |
| F.O.B. | Header | 13 | Yes | Yes | Yes |
| Check Number | Header | 25 | No | Yes | No |
| Other | Header | 29 | Yes | Yes | Yes |
| Other 1 | Column | 29 | Yes | Yes | Yes |
| Other 2 | Column | 29 | Yes | Yes | Yes |
| Memo | Header | 4095 | Yes | Yes | Yes |
| BillAddr Note | Header | 41 | Yes | Yes | Yes |
| ShipAddr Note | Header | 41 | Yes | Yes | Yes |
The "BillAddr Note" and "ShipAddr Note" fields will put information on the last line of the "Bill To" and "Ship To" addresses, respectively. These could be used for a phone number, an E-mail address, etc.
Before you assign data values to header or column fields in Order Transfer, you may need to add them first to your transaction form. This is done by customizing the form in QuickBooks. The following steps will guide you in accomplishing this task; however, the exact steps may differ slightly depending on the QuickBooks edition you are using. If you need help, select QuickBooks Help and enter "Customize Templates" in the search box.
The steps for customizing an invoice form will be outlined here, but the same steps can be followed for a sales receipt form or a sales order form.
If you want to rename the template you just customized:
Now you are ready to assign ShopSite data values to fields in your customized form. In Order Transfer go to Preferences from the Edit menu and click [Transactions 1]. Select the transaction type and then the template name.* Click .
In the Customize pop-up window for the transaction type you selected, you will see a list of ShopSite data fields on the left side and transaction fields (header and column in two separate lists) on the right side. In general, to make a data value assignment, first select a ShopSite data field and then check the box for the header or column field in which the value for the ShopSite data field is to appear.
ShopSite data fields are categorized according to the type of order information they contain. Data values that pertain to the order as a whole belong in the header and so these values can be assigned to header fields only. Likewise, data values that are properties of individual order items can be assigned only to column fields.
ShopSite data fields are displayed in an hierarchical tree structure. Tree nodes with a '+' sign must be expanded to expose the data fields that are contained within them. Data fields that can be assigned only to header fields (order information) are identified by a red "ab" icon, while data fields that can be assigned only to column fields (for item information) will have a green "ab" icon. As item information can only be for a ShopSite product, all item information will be in one place under Product. To find the data fields for item information quickly, click the "expand" link for item information.
When you select a ShopSite data field, the set of transaction fields that the data value can be assigned to will be enabled, while the other set of transaction fields that it cannot be assigned to will be disabled. For example, if you select a data field with the red-colored icon, the list of header fields will be enabled and the list of column fields will be disabled. Also, an "Assign here" link will appear for the enabled transaction fields, and a "Disabled" link for the disabled fields.
If after you have started a data value assignment for a data field and then want to change it, you can simply click on another data field. If you want to cancel a data value assignment before completing it, click on any tree node that is not a data field ('+' or '-'). To change the current data value assignment for a transaction field, select the new ShopSite data field, then uncheck the box and check it again. To remove a data value assignment without reassigning, simply uncheck the box.
* In Order Transfer currently, the data value assignments you make will be applied to all templates of the same transaction type, not just to the template you have selected. A future enhancement may allow data value assignments for individual templates.
If you have custom checkout fields defined in your shopping cart and you want the values for them shown in your sales transactions, there are two ways in which you can do this:
In the tree list, the custom checkout fields are located in Order/Other/CustomCheckoutField. Initially the only fields here are FieldName and FieldValue. Order Transfer doesn't know anything yet about your custom checkout fields. However, if you just want to combine all of the custom field values into one transaction field (the first option above), then all you need to do is select FieldValue and assign it to the Memo field or to another header field of your choice.
The second option above requires that you identify the custom checkout fields by name and have them added to the tree for selection and assignment. When you click the CustomCheckoutField tree node, a link appears to manage checkout fields. Clicking this link will display the Manage Checkout Fields window. In this window you can have Order Transfer query your ShopSite Backoffice for the names of your custom checkout fields and add them to the custom checkout fields list box. This method requires a working ShopSite connection which you select and then click the Sync button. If there are checkout fields downloaded that you don't need to assign, you can select and remove them from the list.
The alternative method, if you don't have a working ShopSite connection, is to enter the custom checkout field names manually. You enter each name one at a time and click the Add button.
Click OK when you are finished identifying the custom checkout fields. The field names will then be added to the tree, replacing FieldName and FieldValue. Next assign the checkout field values to the header fields in which you want the values to appear.
Data syncing is a process by which you keep information that resides in multiple data repositories up to date with each other. When you use Order Transfer to import orders from ShopSite, and ShopSite products are added to your company file, you may want to keep the prices and inventory levels for these products the same in both places.
The data syncing feature in Order Transfer is two-way, which means that information can flow from either data source to update information in the other. To keep things straight as to which way the information is flowing, export means that information is flowing from QuickBooks to ShopSite to update products in ShopSite, and import means that the information is coming from ShopSite to update items in QuickBooks. Order Transfer is the mechanism through which the information flows.
In addition to updating prices and inventory levels in QuickBooks, the importing process can also add new items to your company file. If you are just starting out using QuickBooks with ShopSite, you may want to populate your QuickBooks company file with ShopSite products by importing them directly from ShopSite instead of when orders are imported. The exporting process, however, will not add new products to ShopSite; it can only update existing ShopSite products.
When importing data from ShopSite, you can specify a subset of products for which the related QuickBooks items are to be updated. In other words, data syncing can be restricted to only those QuickBooks items where the related product names or SKUs satisfy a search criteria. Another method you can use to achieve the same result is to go into the ShopSite Backoffice and download only the products that you want updated in your company file.
Exporting QuickBooks data to ShopSite requires that you first create an export configuration file. When creating this file, you select the QuickBooks items that you want to export, along with data you want to export, such as price, quantity on hand, and low stock amount (the reorder point).
You can create as many export files as you need for syncing data of different categories, batch sizes, or store locations. Once created, you can modify them to add or remove QuickBooks items for exporting, and you can change the data that are to be exported for each item.
Data syncing is an Order Transfer feature that requires a separate product license to enable it. You can purchase and download the license from the ShopSite web store. After downloading, go to the Help menu to install it.
The Import feature in Order Transfer is used to update unit prices and inventory levels for QuickBooks items that are matched to ShopSite products (see "Matching ShopSite Products to QuickBooks Items"). Importing can also be used to add ShopSite products as QuickBooks items in your company file.
To import ShopSite data into QuickBooks, the data must first be downloaded to Order Transfer. There are two ways in which you can do this:
Using either method, you can download prices and inventory levels for all ShopSite products or only for a subset of products. Using the automatic method in Order Transfer, you can specify search criteria to download information only for products where the product name or SKU contains, begins with, or ends with a given value.
If you choose to download manually from the ShopSite Backoffice, you can either download all products and then have Order Transfer import only those that satisfy the search criteria you specify, as in the automatic download method, or you can manually select which products to download. You can also reduce the download file size by selecting just the price or inventory fields that you want to sync with.
To import product information into QuickBooks, select "Import to QuickBooks..." in the File menu. Then follow these steps in the pop-up dialog window:
The Export feature in Order Transfer is used to update unit prices and inventory levels for ShopSite products from QuickBooks items in your company file. It is important to note that for the updates to work, QuickBooks items must be matched to ShopSite products, either implicitly or explicitly (see "Matching ShopSite Products to QuickBooks Items")*.
Exporting QuickBooks data to ShopSite requires an export configuration file. This is an XML file that you create in Order Transfer as described in the next section. This file contains the item names and item information for updating ShopSite products. As discussed in the "Data Syncing" section above, you can create as many export configuration files as you need, according to how you want to partition your inventory items for exporting.
After your export configuration files are created, you are ready to export QuickBooks item information to ShopSite:
The export file is first updated from the item information in the company file and then the file is uploaded to ShopSite. When the upload is completed, you can click to view a log of the product updates that were applied.
* Products cannot be added to ShopSite from exported QuickBooks items. If an item name is not matched to an existing ShopSite product, the item information is ignored.
To create an export configuration file, select "Export to ShopSite..." in the File menu, then follow these steps:
The name of the new export configuration should now appear in the dropdown list. You can click Add again to add another export configuration, or Modify to make changes to the currently selected one.
To make changes to an export configuration file, select "Export to ShopSite..." in the File menu, then follow these steps:
*When items are added to the list for exporting, the program does not check for duplicates. You can check for duplicates by sorting the Name column and then examining the list.
To view, update or delete an export configuration file, select "Export to ShopSite..." in the File menu, then in the "Export to ShopSite" pop-up window, select the configuration file and click View, Update or Delete.
Remote Data Sharing (RDS) is QuickBooks software that allows an integrated application such as Order Transfer to communicate transparently with QuickBooks on other computers in a local area network (LAN). RDS consists of two components: the RDS Server and the RDS Client. The RDS Server is installed on the same computer where QuickBooks is installed, and the RDS Client is installed with Order Transfer.
Both the RDS Server and the RDS Client installers are embedded in the Order Transfer install as optional features. If you wish to use Remote Data Sharing in Order Transfer, run the Order Transfer install program on the computer where QuickBooks is installed. When you get to the screen for selecting features, check the box for RDS Server and uncheck the box for Order Transfer, unless you plan to use Order Transfer on this same computer also. Then continue with the install.
Next run the Order Transfer install on the computer where Order Transfer is installed (or is to be installed). On the features selection screen, check the boxes for both Order Transfer and RDS Client. Caution: If Order Transfer is already installed, the check box for it will be checked by default, meaning that you want to keep it installed. If you uncheck the box, Order Transfer will be removed!
Start the RDS Server by clicking "Remote Data Sharing Server" in the Start Menu's QuickBooks folder. When it is started, the following screen will appear:
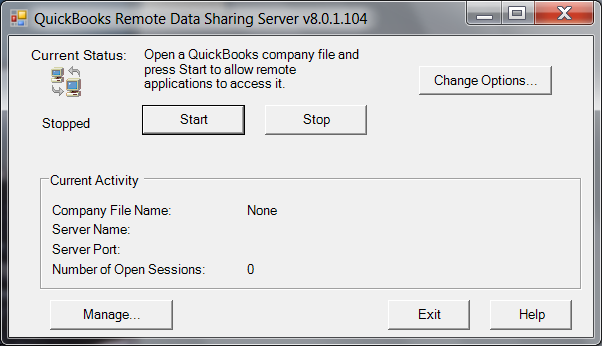
Click "Change Options..."
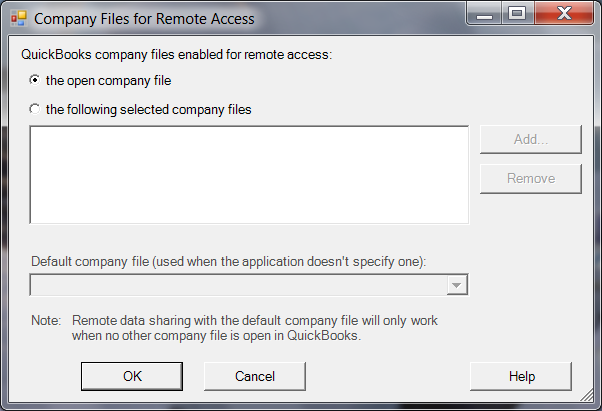
The following screen appears. Select how you want QuickBooks company files enabled for remote access. Refer to the table below for a more detailed description of the options.
| Option | Meaning |
|---|---|
| the open company file |
|
| the following selected company files |
|
If you are using Remote Data Sharing for the first time in Order Transfer, it is recommended that you choose the open company file access method first, as this one is simpler to configure. When you have this method working satisfactorily, you can switch to the second method if you prefer to use that one instead.
Check the radio button for remote access to the open company file, then click "OK" to return to the previous screen:
When you click "Start", the following QuickBooks screen will appear:
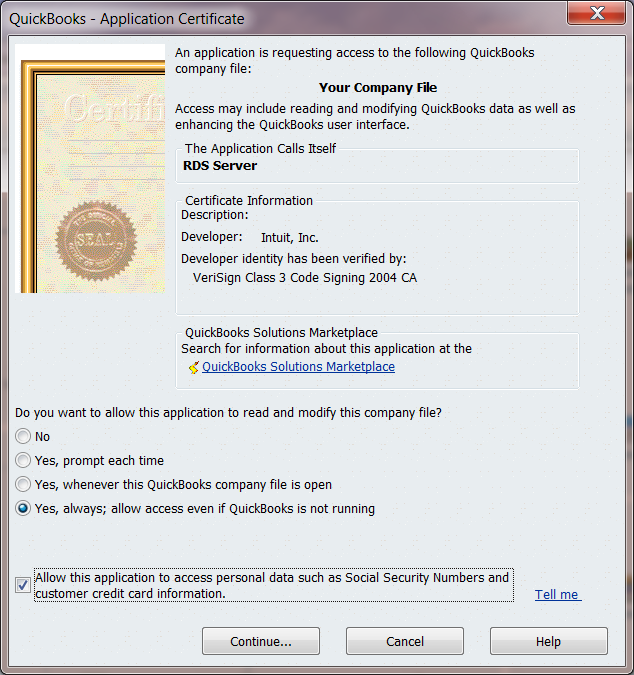
On this screen you are asked how you want to allow the RDS Server to read and modify the company file on behalf of client applications. Check the options as follows:
Click "Continue..."
A screen like the following one will appear:
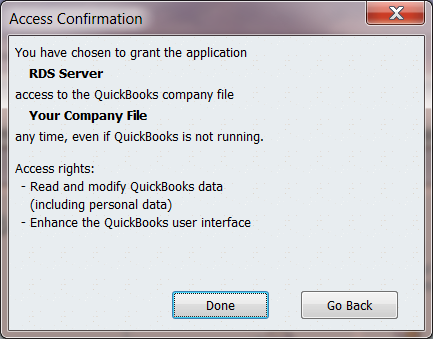
Click "Done".
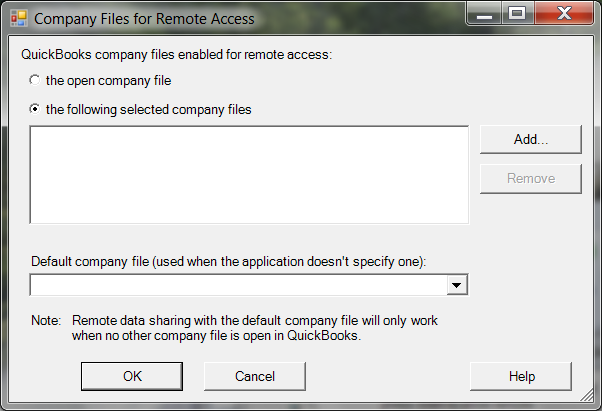
Check the radio button for remote access to selected company files. The "Add..." button will then be enabled. Click this button to display the following screen:
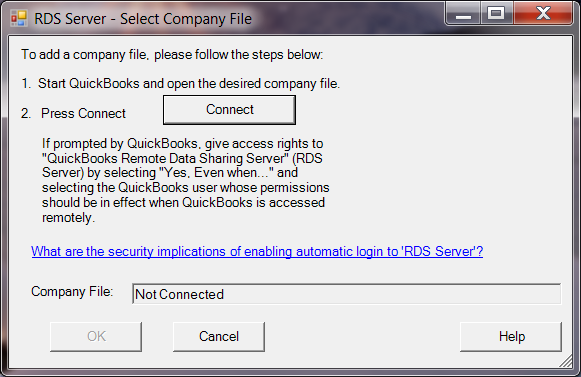
When you click "Connect", QuickBooks will display the following screen:
On this screen you are asked how you want to allow the RDS Server to read and modify the company file on behalf of client applications. Check the options as follows:
Click "Continue..."
A screen like the following one will appear:
Click "Done".
You will then be returned to the "RDS Server - Select Company File" screen with the name of the company file filled in:
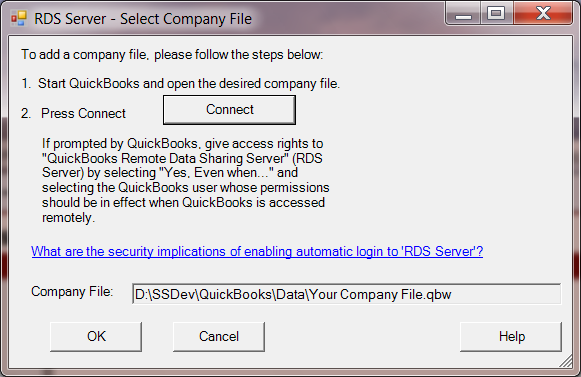
Click "OK".
The "Company Files for Remote Access" screen now looks like this:
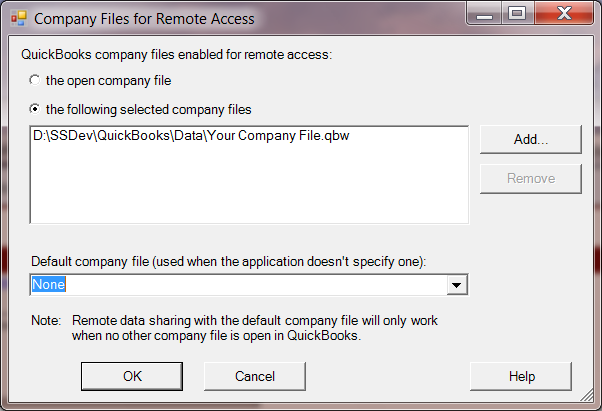
If you have additional company files that you want to share on this server, click the "Add" button again. Otherwise, click "OK".
You should now be back on this screen:
The next task is to register users for remote access to the company files on this server. You will need to provide a login ID and password for each user to be registered.
Click "Manage..."
The following Manager screen appears:
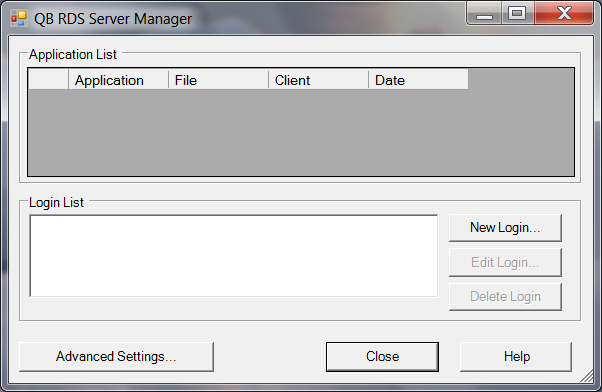
Click "New Login..."
A screen like this will appear:
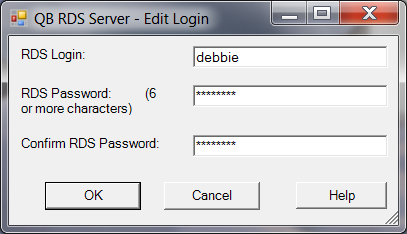
Enter the RDS Login ID and password as shown, then click OK. You are then returned to the previous screen with the user added to the Login List:
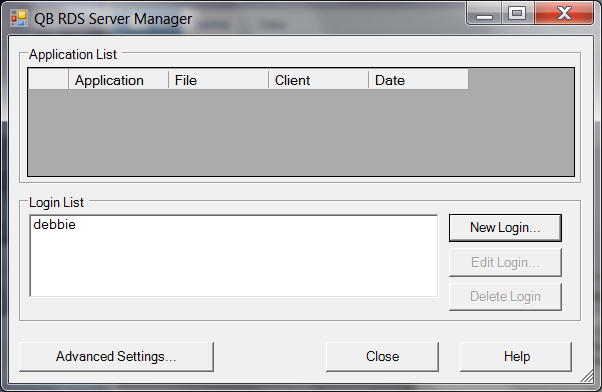
Repeat the process for each user. Click "Close" when done. You are then returned to the "RDS Server" screen:
Click "Start" to start the RDS Server running.
If you have a Firewall enabled and you get a security alert that the server is blocked, then unblock it. When it is time to shut the server down, click "Stop" and then "Exit".
The RDS Client needs to be installed on all LAN workstations that expect to remotely access QuickBooks company files through the RDS Server. The steps below detail how to configure the RDS Client after it is installed on a workstation.
Begin by starting the RDS Server where QuickBooks is installed and let it run. Then start the RDS Client where Order Transfer is installed by clicking "Configure Remote Data Sharing Client" in the Start Menu's QuickBooks folder. When it is started, the following screen will appear:
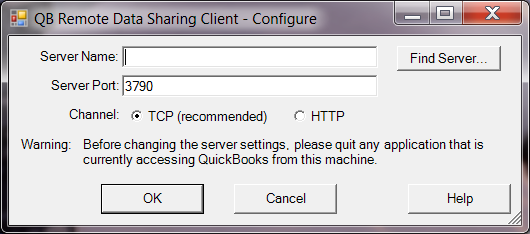
Enter the full name of the computer on which the RDS Server is running, or click "Find Server..." to locate it from this screen:
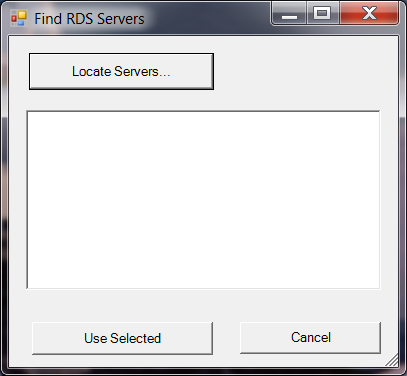
Click "Locate Servers..."
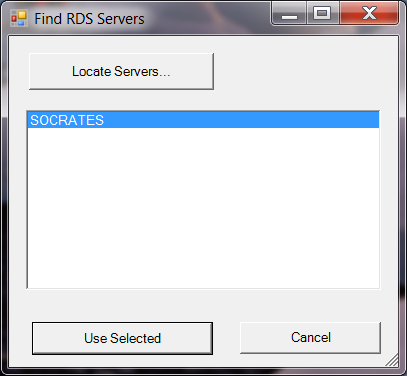
If the RDS Server is found, select it in the list and click "Use Selected":
You will be returned to the starting screen with the server name filled in:
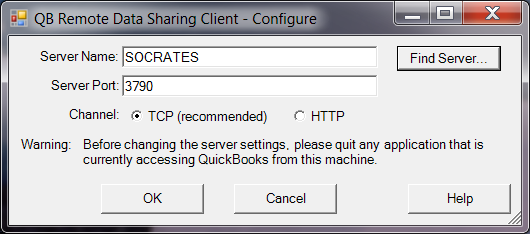
Click "OK".
The following screen appears next:
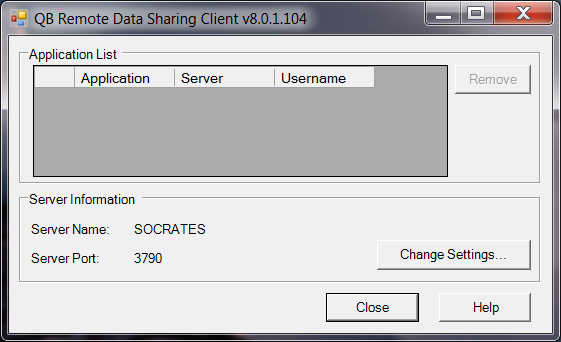
The RDS Client is now waiting for an integrated application to request remote access to a QuickBooks company file, which is done in the next step. Click "Close".
Run Order Transfer, check the Remote radio button, then click Open Session. The following QuickBooks window should appear:
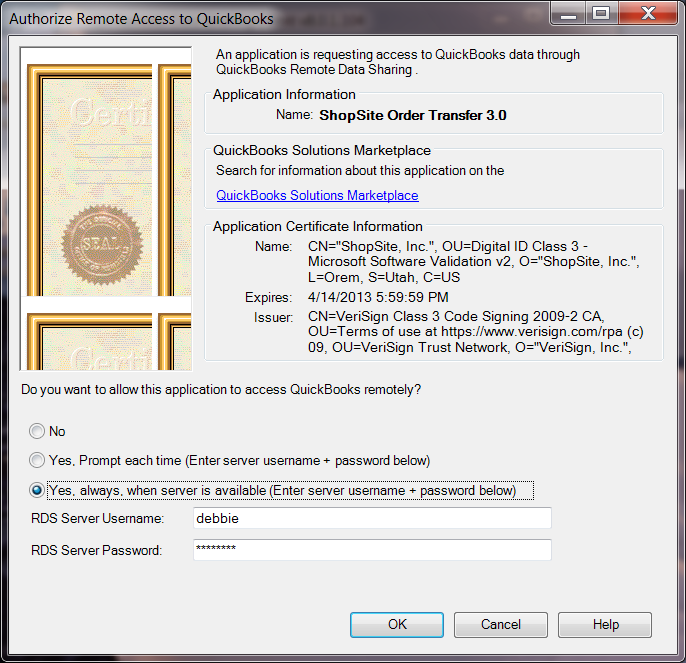
Here you are requested to authorize remote access to QuickBooks. Check the "Yes, always" option and enter the RDS Server Username and Password as shown. Click "OK".
The RDS Client is now configured to access the company file through the RDS Server. When you run the RDS Client again, you should see Order Transfer in the application list and the RDS Server that it connects to:
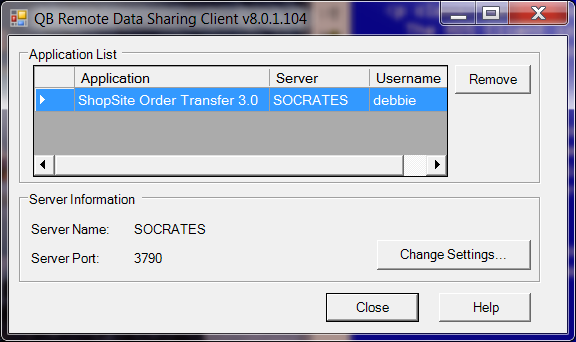
If the configuration should need to be changed, such as the user name and password, select Order Transfer in the application list and click "Remove". Then the next time Order Transfer requests remote access to QuickBooks, QuickBooks will display the authorization window again in which you can enter the new user name and password.