Use the Add a Page feature to create a new page for your store. You can later assign products to the page, or use it for any other purpose in your store. You can create links from other pages in your store to the new page.
Consult the list below for explanations of the different fields. If there are any fields that you do not understand, leave the default setting.
Page Name |
This is the name that appears at the top of the page and at the top of the browser window when viewed on line. This is also the name of the record in the database (the list of pages), so even if you have four pages of T-shirts, you may want to name the pages "T-Shirts Page One" and "T-Shirts Page Two," so you can differentiate. |
Name Toggle |
If you have a banner graphic for the page that contains the page's name, you probably want to uncheck the Name Toggle box. You must still give the page a name so that it appears in the database, but your customers will not see the name on the page under the banner graphic. |
|
Select the graphic, if any, that you want to appear on the top of this page. It will appear above the text and products on the page or down the left side of the page, depending on the page theme or template that you choose. Use the radio buttons to select the method for finding your image:
- The top option provides a pull-down menu of all the images that are in your media directory.
- The bottom option allows you to specify the URL of an image or the directory path to an image. This option is useful if you have many images and have grouped them into different subdirectories on your server.
If you want to insert an image anywhere else on the page, use an HTML tag in that field. |
Graphic Toggle |
If you are using a banner graphic on the page, you can use this checkbox to temporarily remove the graphic and not have to find it in the list when you want to put it back. |
Text 1 |
Text you enter here will appear immediately below the graphic and page name, but above any products or page links, like this. You can enter any combination of text and into this field. |
Text 2 |
Text you enter here will appear immediately below the products and page links, but above the page footer (if there is one), like this. You can enter any combination of text and HTML into this field. |
Text 3 |
With the default template, text you enter here will appear at the very bottom of the page, like this. You can enter any combination of text and HTML into this field. Note: Further down the screen you will select a page template. Some page templates display Text3 text in other places. |
Link Info
If other pages in the site are going to display links to the page that you're editing now, then you need to provide link information. The only page that might be left without link information is the welcome page, but you may want to consider linking every page back to the welcome page too. Remember that you are also free to use custom HTML to make links to your pages if you do not like the way that they are displayed by default.
|
Link Name |
This will usually be the same as the Page Name you entered above. This is the text that will appear on the referring page. It will appear "hot" that is, clicking on the text will take the customer to the new page (the one you're editing now). You may decide to display either a text link, a graphic link, or both. If you don't enter anything in this field, and you don't specify a link graphic, ShopSite will use the Page Name for links from other pages. |
Link Graphic |
This is a clickable graphic that appears on the referring page. Clicking on the graphic brings up this page, just as clicking the link name does. You may decide to display either a text link, a graphic link, or both. Use the radio button to select the method for finding your image, as described for the Banner Graphic field, above. |
Link Text |
This is descriptive text that accompanies the link name and/or graphic on the referring page. It is optional. You can use it to entice customers to visit a certain page, such as by saying, "We have the lowest prices on granola bars!" next to the link to the page where your store sells granola bars. |
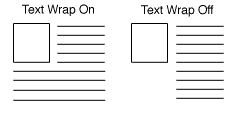
Link Text Wrap |
If this option is set to "on," and you have both a graphic and text for your page link, the text will wrap around under the image. Otherwise, it will appear to the right of the image in a straight column. You only need to set this field if your link contains a lot of text.
|
Link Location |
Every page in your store appears in this section with a check box next to it. Check all of the pages that you want to have a link to the page that you are currently editing. For example, if the page you are editing now is "Silverware," and you check none of these boxes, no links to the Silverware page will appear in the site. If you check all the boxes, a link to the Silverware page will appear on all store pages. |
Layout Info
These options give you control over formatting the products and page links that appear on your page.
|
Page Template |
There are several page themes and templates to choose from to customize your store's look and feel. If you have applied a theme to your store, selecting a different template here may give unexpected results. See the Page Templates documentation for a description of the different page themes and templates. There are also several product templates that you can use to control the way that individual products are displayed. |
Item Alignment |
Choose how you would like products and page links aligned in each column. This setting does not affect the Text1, Text2, and Text3 fields. Remember that you can also apply Product Templates to further customize how each product image lines up with the product name, price, and description. |
Columns |
Laying out your products or links in two or three columns is often a good idea, aesthetically. Depending on how wide the items are, you may even be able to fit more columns, but remember that not everyone can view wide pages without scrolling. Assume that people will be viewing the site on a 14" monitor. This setting does not affect the Text1, Text2, and Text3 fields. |
Column Borders |
Checking this box will create a border around each product and link on your page. |
Page Width |
Setting the page width to less than 100% will create margins on the page. If you set the width to 90%, the page will have a 5% margin on each side, and the contents of the page will be displayed in the remaining 90% in the middle. Margins can improve the aesthetic quality and readability of a page. |
Page Header |
Check this box to place your store's page header at the top of this page (or down the left, depending on the page template you choose). You can edit the page header for your store in the Preferences section of the ShopSite. |
Page Footer |
Check this box to place your store's page footer at the bottom of this page. You can edit the page footer for your store in the Preferences section of the ShopSite. |
Page Colors
Make selections here to set the color of the text on the page, the background color or image for the page, and the color of links before, after, and while they are being selected. See the ShopSite Color Reference Chart for examples of all available colors. |
Text Color |
This sets the default display of nonlink text to the color you choose. Be sure to choose a dark color (black is usually best) unless your background is dark, so the text on your site is easy to read. |
Background Color |
The entire background of your page will be displayed in the color you choose here, unless you select a background image, in which case the image will appear instead of the color. Be sure to choose a light color for the background, unless you have selected a very light color for your text. |
Link Color |
Unvisited links to other pages and sites will appear in the color you select here. |
Visited Link Color |
After a customer has clicked on a link and visited the page, the color of the link will change to the color you select here, to let customers keep track of where they've been. |
Active Link Color |
The color selected here will only be visible at the exact moment someone is clicking on the link. Adding a bright color here adds pizzazz. |
|
If you have uploaded an image of a textured background to your media directory, you can use that image as a background for your site. Be careful, though, as the image will tile, meaning that it will appear multiple times as a repeating pattern, so it's a good idea to use images that were designed specifically for backgrounds. Use the radio button to select the method for finding your image, as described for the Banner Graphic field. |
Advanced Info
The fields in the Advanced Info section help search engines to find your pages, and help customers to find products on your pages.
|
File Name |
This setting is optional. Use this field to give the page a file name that describes the page's contents, such as "wooden_toys.html" or "customer_service.html." Be sure to put a .html or .htm suffix on the end of the file name, or the page will not display correctly. If you do not assign a name to the page, it will have a default file name, such as page1.html or page2.html.
The file name cannot contain spaces or any of the following characters: '?', '+', '=', '&', '@' |
Metakeywords |
Metakeywords are used by search engines such as AltaVista and HotBot to match searches to the information on a page. Enter keywords that search engines should match to find this page. |
Metadescription |
Enter a description that you want search engines to display for this page when a search matches this page. Not all search engines use the Metadescription text.
You can also use this field to insert meta tags and other material into the <HEAD> section of the page, such as META fields or JavaScript code. First, type in any text that you want within the <META desciption= > tag and close the tag with ">. Then type in any additional tags or scripts (the field scrolls to hold more lines). Do not put the closing "> at the end of your last tag, as ShopSite will add that automatically. For example, to add a META name tag, you might enter something like this:
your, keywords, go, here"><META name="your meta tag" content="your content |
Product Search Field |
Check this box to add a Product Search box to this page, which allows customers to search for products in your store. |
Index |
Check this box to allow this page to be indexed so that it can be found when customers search for products. |