|
|
ShopSite Quickstart Guide |
Welcome to the ShopSite Quickstart guide. This document gives you the basic steps for getting your store up and running:
Rather than printing out this document, try to read it online. It contains graphics and hypertext links, allowing you to look up more information about specific terms and concepts discussed in this document by clicking on the highlighted word.
![]() While you are using ShopSite, you can click the help button at the top of any screen to get detailed information about that screen. The help button also gives you access to the main ShopSite help system.
While you are using ShopSite, you can click the help button at the top of any screen to get detailed information about that screen. The help button also gives you access to the main ShopSite help system.
From a customer's point of view, a ShopSite Web store is special-purpose Web site that offers products for sale. A ShopSite store has one or more screens that display and describe products, and a shopping cart where customers can buy those products by giving their name and address and, typically, providing credit card information. Beyond that, the look and feel of a ShopSite store can vary quite a bit, depending on the number and types of products being sold, and the taste and skill of the person who designs the store!
Your view of the store as a seller is quite different. Although your store is made up of pages, and there are products for sale on those pages, you don't have to edit the store pages directly, and you don't even have to know how to make a Web site or page. You access the ShopSite seller interface with your favorite browser, and add products and pages to your store's database by clicking on buttons and filling in fields. Don't let the word "database" scare you - you never even see anything that looks like a database!
Once you've added products and pages to your store and done some initial configuration (the Store Setup Wizard walks you through this), you can click the Publish tab to create the store as your customers will see it. ShopSite builds the pages for your store as you've told it to and puts the products on the pages. ShopSite puts the finished pages where the server can find them and serve them to customers.
You can make changes to your store's products and pages databases at any time through the same easy interface that you used to first build your store. However, because you've only changed the database, customers won't see those changes until you again click the Publish tab to have ShopSite rebuild your store's pages.
ShopSite also provides notification of orders and easy, secure access to order information. ShopSite Pro and ShopSite Manager offer real-time credit card processing so that you can provide your customers with the easiest and most efficient online store available.
Sound good? The first step that you need to take, if you haven't done so already, is to...
The first step is to contact a hosting service. The hosting service supplies the disk space that will physically hold your online store. The hosting service also provides the Internet connection that allows customers to view your store. After you make the necessary business arrangements with the hosting service, you will get a directory and two URLs. Your customers will use one URL, the store front URL, to access your store. You will use the other URL, the ShopSite URL, to create, update, and manage your store. Be sure to make bookmarks for both URLs or add them to your Favorites.
While you are making arrangements with a hosting service, you can start planning your store. You need to
Start by deciding which items you want to sell in your store. Write out descriptions and choose prices for each product. Organize items into categories and decide which products fall into which category. Typically, each category corresponds to a page in your store.
The decisions you make here are not permanent. You can add, remove and reassign products and pages at any time after you build your store.
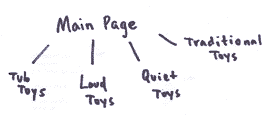
A small toy store might organize products this way:
Your store will be more useful and appealing to customers if you include pictures of each product. You may also want to consider an appealing logo.
Pictures must be in jpg or gif format. If you have ability to scan and edit images yourself, you can simply create the images and store them for later. Otherwise, hire a graphic designer to take photographs, or use photographs that you supply, and use them to produce images in gif format. When you receive the images from the graphic artist, store them on your computer.
When you create your store, you specify which payment methods (MasterCard, Visa, check, etc.) customers can use, how products will be taxed, and how products will be shipped. The store creation process will go faster if you know this information ahead of time.
A payment method is any type of payment you choose to accept from customers. Some payment methods, such as credit cards, must be authorized and settled by a financial processor.
ShopSite Pro and ShopSite Manager support third party payment processors CyberCash, Authorize Net, ClickPay, and VeriSign Payment Services.
ShopSite calculates taxes based on the customer's location in relation to the store's location. You can create several different tax rates for customers to choose from, such as different tax rates for customers who live in or out of your state or province.
You should check with a qualified tax attorney or specialist if you have any questions regarding the type of tax you should charge.
Before you open your store. you should select at least one carrier (UPS, Federal Express, etc.), and determine which types of shipping options you will offer (overnight, ground, two-day air, etc.). You also need to decide how your store will calculate shipping charges. ShopSite supports the following methods for calculating shipping charges:
After your arrangements with the hosting service are complete, you are ready to log in to ShopSite and begin building your store. To log in to ShopSite, use your favorite browser to go to the ShopSite URL. A small window appears and asks for your name and password, which you selected as part of your arrangements with the hosting service.
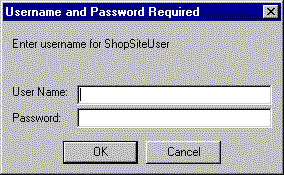
Enter your name and password, and click OK.
When you first log into ShopSite, you see the Store Setup Wizard. The wizard lets you create a simple, functional store to get you up and running with ShopSite.
The wizard walks you through the following steps:
After you have provided all the required information, the wizard generates the HTML pages and publishes your store. At this point, your store is open and ready to accept orders.
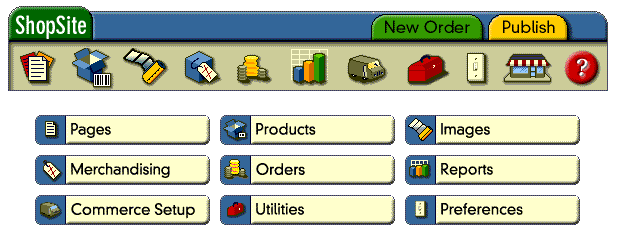
When you're done with the wizard, you will be at the main ShopSite screen, shown below. You use this screen for all further configuration and management of your store, and to process orders and view reports. To see how your store looks, click the My Store button at the top of the screen.
After you look at your store, return to ShopSite and take a few minutes to click various buttons and get a feel for how ShopSite works.
When you ran the Store Setup Wizard, you created some pages and assigned products to them. You can change those pages or add new ones at any time by clicking the Pages button. From there, you can:
Now that you have a basic store, you change or add products by clicking the Product button. You can add or edit several products at once, or one at a time.
You can upload images at any time. When you upload images, they are placed in a directory called media under your store's directory at the hosting service. Once the images are in the media directory, you can add them to pages.
To upload images, click the Images button. This bring you to the image manager.
ShopSite lets you assign an image to each product and page. You can also put images anywhere else on a store page by putting the correct HTML tag into your text whereever you'd like the image to be. Try typing <img src="media/myimage.gif"> where myimage.gif is the name of the image you sent to your graphics library.
You set basic shipping, payment, and tax options when you ran the Store Setup Wizard. You can change these options or configure more sophisticated options by clicking the Commerce Setup button.
Use the Commerce Setup functions to set and modify shipping, payment, and tax options.
There are a number of customization options available that are not covered in this quickstart guide. After reading this document, take a look at the rest of the documents in the ShopSite Help. The online help resources explain every feature in detail and can be a launch pad for your exploration into ShopSite's features.
![]()
![]()
|
ShopSite Help and Resource Center February 13, 2004 Give Feedback |
 ShopSite Shopping Cart Software |