ShopSite 6.0 for Windows 2000 Server and Windows NT Server Installation Instructions
To install ShopSite on your Windows NT or Windows 2000 server, you need admin access to the server and an FTP program.
If you are upgrading from a previous version of ShopSite, please use the upgrading instructions.
Table of Contents
- I. Pre-Installation Considerations
- II. Planning ShopSite folders
- III. Create the Merchant User Account
- IV. Run the Setup Program
- V. Enable Logging
- VI. Build Your Store!
- VII. Adding Stores
- VIII. Adding Languages and Locales
- IX. Upgrading
- X. Troubleshooting
- Before installing ShopSite, make sure that your system meets the minimum hardware and software requirements.
- Be sure your Web server software is working correctly, including user authentication. If your Web server is not working, you cannot install ShopSite.
The ShopSite standard setup places ShopSite files in predefined folders, as illustrated below. If those folders do not match the configuration of your server, you can choose a customized setup and enter folders and URLs that do match your server. The setup program will prompt you for the locations of five folders:
Plan the folder locations before starting the installation. The folders for the standard installation look like this:
 C:
C:
 InetPub

 wwwroot
StoreName = HTML output folder, aliased to Storefront URL
defined in store.auth file
 Store pages
media - merchant may need FTP access
Store images
shopsite = ShopSite folder, will contain virtual folders
linked to ShopSite, Shopping Cart, and images folders
Program Files
ShopSite
data
StoreName = data folder
images = shared ShopSite images
= Shopping Cart folder
ss = ShopSite folder
The ShopSite Setup program will set the requried access permissions for each directory.
As part of installing a ShopSite store, you must create a user account for the merchant and a group named "ShopSite." (Note that you should not use "ShopSite" for the merchant account name.) You can do these steps before starting the installation or when prompted to do them by the setup program. Click on the link that corresponds to the Windows version that you use for detailed instructions.
- If you have not already done so, FTP to support.shopsite.com and download setup.exe and your store.auth file to the folder from which you will run the install. (Note that you must log in with a password provided by your ShopSite account manager.) If you use FTP to retrieve the files, be sure to use a binary mode transfer.
- If there is a patch folder in the Windows folder on the FTP server, open it. Download all of its contents to the install folder on your server. If there are patches, you will install them after completing the regular installation.
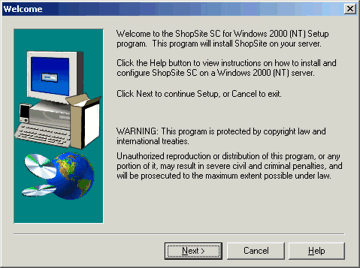
- Double-click setup.exe to start the setup process. Click "Finish" in the InstallShield unpacker dialog box to reach the setup Welcome screen.
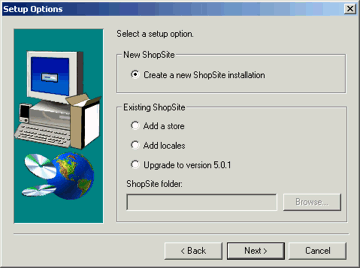
- Click Next to advance to the Setup Options screen. Select Create a new ShopSite installation to install ShopSite on your server.
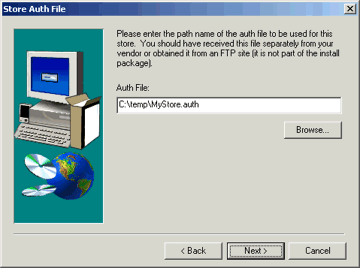
- On the next screen, type in the location of your store's auth file, or use the Browse button to locate it.
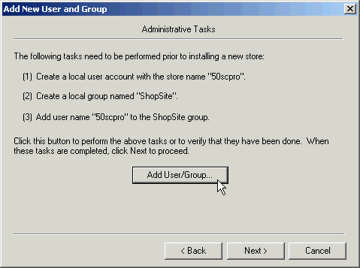
- If you did not create a user account for the merchant before running the setup program, click the Add User/Group button on the Add New User and Group screen to launch the appropriate IIS application.
For detailed instructions, click on the link that corresponds to the Windows version that you are using.
After you have created the merchant account and the "ShopSite" group, close the IIS admin program and click Next on the ShopSite setup screen.
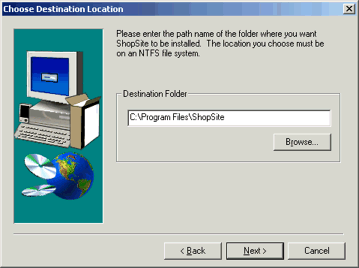
- On the Destination Location screen, click Next to install ShopSite in the default location. Type a new location or click Browse to specify other locations for ShopSite files. The rest of these instructions assume you've chosen the default location.
- The "Web Site for ShopSite Store" screen shows you the web site and output directory that will be used for this store. It contains these sections:
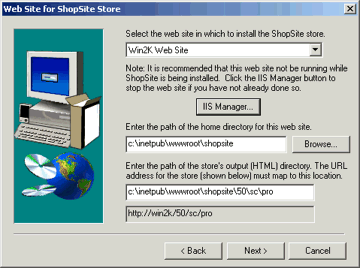
- Select a Web Site - If you are hosting multiple Web sites on your server, use the drop-down list to select the site that will host this ShopSite store. Use the Browse button or type in the path to the home folder for that Web site.
Note: |
It is highly recommended that you stop this web server while ShopSite is being installed. If you have not yet stopped the web server, click the IIS Manager button and do so now.
|
- Output (HTML) directory - Identifies the path and URL of the folder that will contain the HTML files produced for this ShopSite store. The URL is set in the store's auth file and cannot be changed. Enter the path to the destination folder of the URL. Each store must have it's own output directory.
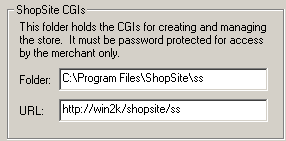
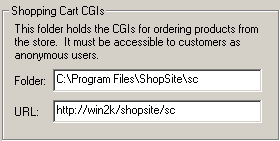
- The "ShopSite Folders and URLs" screen shows you the folders and associated URLs that ShopSite will use for the installation. It contains these sections:
- ShopSite CGIs - Identifies the path and URL of the folder containing the programs for creating and managing Shopsite stores. Each store can have its own ShopSite CGI folder, or multiple stores can share one set of CGIs.
- Shopping Cart CGIs - Identifies the path and URL of the folder containing the programs that let customers order products from a store. Each store can have its own Shopping Cart CGI folder, or multiple stores can share one set of CGIs.
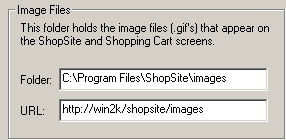
- Image Files - Identifies the path and URL of the folder containing the common images used by all ShopSite stores.
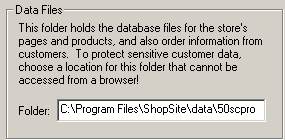
- Data Files - Identifies the path of the folder containing the databases for the store currently being installed. Each store must have its own folder for data files. This folder must not be under the Web server's document root folder and it must not be accessible via a browser.
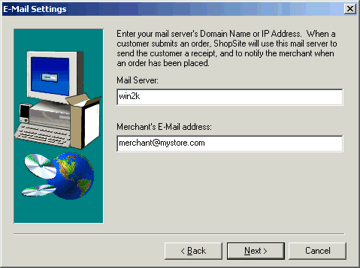
- On the Email Settings screen, enter the name or IP address of your mail server and the e-mail address that ShopSite should use to notify the merchant of new orders.
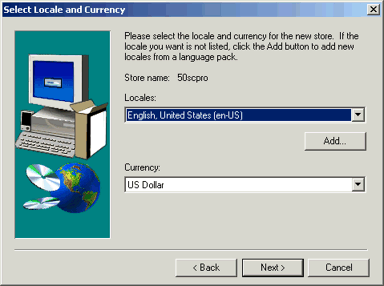
- Select a locale and currency for the new store. The merchant can change these settings later. These initial settings will be used for both the merchant interface and the store pages.
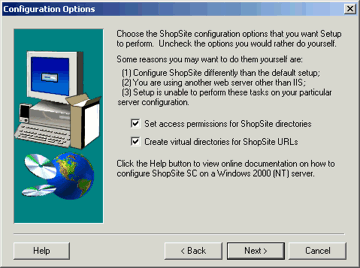
- In the Configuration Options screen, leave the boxes checked to have the setup program set access permissions and create virtual directories. Uncheck either or both of the boxes if you are not using IIS as your web server, or if the setup program encounters an error when running, or if you want to do something unusual with directories and permissions. In any of those cases, you will have to set access permissions and create the virtual directories manually. You can follow the instructions for IIS 4 or IIS 5, but if you're using a different web server, you're on your own.
- Before the setup program starts copying files to your server, it shows you the folders and settings that it will use. Review this information. If it is not correct, click the Back button and make changes on the appropriate screens. If the information is correct, click Next, and the setup program will install ShopSite.
- When the setup program is finished, the ShopSite Setup Complete screen gives you several options:
- You should restart the web server by clicking the IIS Manager button.
- Check the option box to launch the Store Setup Wizard when you exit the setup program. The Store Setup Wizard guides the merchant through the initial creation of their store.
- Check the option box to view the setup log when you exit the setup program. This will open your browser and display all of the settings used during the installation, which can be useful for your server records.
- Click Finish to exit the setup program.
You can rerun the setup program to install additional stores or locales.
- If you downloaded any patch files, install them now. Patches are usually a newer version of a CGI file that was originally installed as part of ShopSite, so each patch will have the same name as an existing file on your server. Locate the existing file in the ShopSite folders and make a copy of it or back it up to some other location.
- Copy the patch file over the existing file.
- Repeat the last two steps for each patch file that you downloaded.
To view the Web Server statistics (hits, pages viewed, etc.) from ShopSite, the server log format needs to conform to the NCSA format. Follow the steps for the version of IIS that you are running.
Once you've installed the software, you're ready to build your store! Point your browser at http://ServerURL/shopsite/ss/start.cgi. After entering your username and password, you'll see the first page of the ShopSite Store Setup Wizard, which will guide you through the process of building a store.
You can click the "?" in the upper right-hand corner of any screen to get help on that screen, and to access the searchable ShopSite help system and knowledgebase.
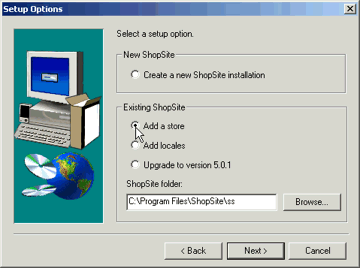
To add a new store that shares CGIs with existing stores:
- Obtain a store.auth file for the new store.
- Create a Windows user account for the ShopSite merchant.
- Run the ShopSite Setup program by double-clicking setup.exe.
- On the Setup Options screen, select Add a store. Verify that the path to the ShopSite folder is correct. If it is not, use the Browse button to locate the correct folder. (Note that this is the folder that contains the ShopSite merchant CGI programs, not the folder that holds store's HTML pages.)
- On the next screen, type in the location of the auth file for the new store, or use the Browse button to locate it.
- Verify the locations for the store's data and output folders.
- Enter the merchant's e-mail address.
- Select the locale and currency for the new store.
- Verify the settings that will be used to create the new store. If they are not correct, click the Back button and make changes on the appropriate screens. If they are correct, click the Next button, and the setup program will create the folders and files for the new store.
The ShopSite setup program lets you select a language and locale for each new store. If you have purchased additional language packs, you can use the ShopSite setup program to install them, and you can add more locales from any installed language packs (each locale provides a unique combination of language and currency settings).
- Download the language pack from shopsite.com.
- Unzip the language pack into a temporary folder.
- Run the setup.exe program.
- On the Setup Options screen, choose Add locales.

- If the locale that you want to make available to merchants is already installed, simply select it from the list of locales. If the locale is part of a new language that you are installing, click the Add button, then enter the path to the unzipped language pack and select the locale.
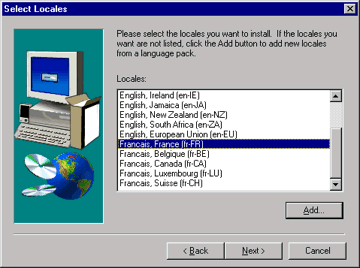
- Click Next to install the selected language and locales.
Upgrading ShopSite will affect all stores that share the same ShopSite folder.
- Shut down the web server before running the installation program. IIS will complain if someone is even accessing your graphics during the upgrade.
- Run the ShopSite Setup program.
- On the Setup Options screen, select Upgrade to version 5.0.x. Verify that the path to the ShopSite folder is correct. If it is not, use the Browse button to locate the correct folder. (Note that this is the folder that contains the ShopSite merchant CGI programs, not the folder that holds store's HTML pages.)
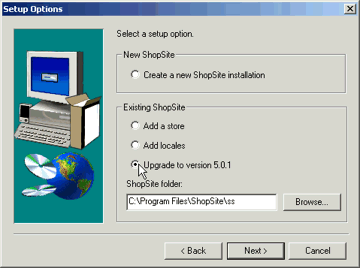
- Click Next to start the upgrade process.
After the upgrade completes, your stores will be at version 5.0.
If your installation did not work, pay attention to the error messages you receive; they should point you in the right direction. If that fails, try checking the following:
- Are file permissions set correctly for all the folders that you specified? Not having file permissions set correctly is the number one installation problem that users run into. Specifically, the user account under which the install program is executed needs to be able to write in the ShopSite folders.
- Do you have administrator permissions, which are required to run the install program?
- Is your Web server configured correctly?
- Did you enter the same store ID and URL that you told the salesperson when the store.auth file was originally created? If you've changed your mind, you'll need a new store.auth file.
- Try downloading a fresh copy of setup.exe from shopsite.com; sometimes the file can get corrupted in FTP transit. Be sure to use a binary-mode transfer.
