Power Edit is a time-saving feature that allows you to select multiple products from your store and edit one or more of their attributes on one screen. For example, if you would like to change the prices for most of your products, select those products from the list, click the Power Edit button, and then select Price from the list of fields. A screen appears containing the name and price field of each product selected, allowing you to make the change easily.
Here is a list of fields that you can change using the Power Edit Products feature:
Product
Name |
This is both the name of the product that will appear wherever the product is displayed, and also the name of the record in the database (the list of products). Even if you do not want the name of the product to appear in your store, you must give it a name here. You can set which fields to display for the product using the Toggles checkboxes farther down on the list of fields. |
Price |
This is the price for the product that will be displayed in your store, but it is also used to calculate order totals. Even if you do not want the price of the product to appear in your store, you must enter it here. You can set which fields to display for the product using the Toggles checkboxes farther down on the page. You can change the currency symbol and format in the Store Text section of ShopSite, under Preferences. |
On Sale
Price |
If you want to offer the product at a sale price, enter that price here, either as the actual sale price, or as a percentage off the Price that you entered earlier. To enter a percent off, you must include the percent sign (%). |
Taxable |
If sales tax can be charged on this item, check the Taxable box. You can set the tax rates in the Sales Tax section, under Commerce Setup. |
SKU |
stands for "Stock Keeping Unit". In some countries it is called a "stock code." It's a number that sellers use for tracking their items. If you track your merchandise by SKU, code name, or any other number, you can enter it in this field. By default, this numberwill not be displayed on your stores pages(though you can choose to have it displayed, below), but it will appear when the item is ordered, to make fulfillment easier. |
|
This is the image that will appear next to or above the product information (the arrangement depends on which product template you choose). All files in your store's media directory appear in this pull-down menu. If you would like to create a graphic, that is, if you would like to display a smaller image that, when clicked on, leads to a larger one, put your small graphic here and use the More Information Page feature to display the large one.
Use the radio button to select the method for finding your image:
- Click the pull-down menu to select an image from your store's media directory. All images that you have already uploaded to your media directory appear in the menu.
- The bottom option allows you to specify the URL of an image or the directory path to an image. This option is useful if you have many images and have grouped them into different subdirectories on your server.
|
Product Description |
If you would like to provide descriptive information about the product, add it here. You can also put HTML tags into this field for ultimate customization. For example, you could format product data into a table or create a bullet list of features. If you would like to enter little or no text here but provide more information on a separate page, use the More Information Page feature. |
Shipping and Download Information
|
Weight |
If you have shipping by weight selected as your shipping option in the Commerce Setup, you must enter the weight for your product here, so that ShopSite can calculate shipping costs. Do not specify a unit of measurement (pounds, ounces, kilograms, etc.), but use the same unit of measurement for all products in your store. |
Shipping
Charges |
If you have either Base Shipping or Base Plus Shipping selected in the shipping options, a field appears here for a per-product shipping charge for each shipping method you have chosen. Enter the price to ship the current product via each of the shipping methods you have specified. |
Ordering Options
|
|
Ordering options let you present product variations in drop-down lists that appear on the products page and the shopping cart, or just on the shopping cart screen. Rather than create a page in your store that lists every possible product variation, you can use a single product and let customers choose options from drop-down lists. For example, on one page in your store you might list a polo shirt for sale, and have drop-down lists for the customer to select a size and color.
See the help for Ordering Options for explanations of the fields and to view a sample order form with drop-down lists. Ordering options always appear in the shopping cart, but you must check the Display Ordering Options box to have ordering options appear on your store pages. |
Product Display Location
|
Product
Location |
Every page you have created so far will appear in a list here. Check the box next to the name of each page where you would like this product to appear. If you want to assign this product to a page that you have not created yet, you can use the Assign Items feature in the Pages section after creating that page. |
|
If you check the box to create a More Info page, the name and image for your product become a that leads the customer to a separate page containing additional information. A More Info page is perfect for displaying a larger image or a long block of text which would look unattractive or make the regular product page load too slowly. You can customize the look of More Info pages in the Preferences section of ShopSite.
|
More Info Page |
By checking this box, the name and graphic of the product become a that, when clicked, takes the customer to a page that can contain a larger image and a more detailed description. |
More Info Page
Text |
You can enter a virtually unlimited amount of text (and HTML tags) into the More Information text box to fully describe the product. |
More Info Page
Image |
Choose a graphic from the files in your media directory for the more information page. This graphic can be larger than the product graphic specified above, creating a effect. Use the radio button to select your image, as described for the Image field. |
More Info Page
File Name |
This setting is optional. Use this field to give the more information page a file name that describes the page's contents, such as "rubber_ducky.html" or "1_caret_ring.html." Be sure to put a .html or .htm suffix on the end of the file name, or the page will not display correctly. If you do not assign a name to the page, ShopSite will give it a default file name, such as page1.html or page2.html. |
Product Layout Info
The fields in this section control how the product appears on the page in your store
, such as controlling what information is shown and the style and size of fonts
.
|
Template |
There are several templates that determine how product information will be displayed on the pages. For a detailed description of these templates, see the Product Templates help. |
|
Here you can choose which product information you would like to display on the page. By default, the product name, price, graphic, and Add to Cart button are all displayed, and the SKU is recorded but not displayed. If you are using the More Info Pages feature, it can be effective to display only the product name and/or graphic, and display the rest of the information on the more info page.
Note: |
The On Sale Toggle causes the sale price to display or not display, thus putting the product on sale or leaving it at the regular price.
|
|
Display Order Quantity |
Check this box to have ShopSite display a quantity box for this product on your stores pages. Quantity boxes appear for all products on the order form, but checking this box will also display a Quantity box on the stores pages. |
Display Ordering Options |
Check this box if you have defined ordering options for this product and want those options to be displayed on the stores pages as well as on the order form. Ordering options are always displayed on the order form, but checking this box will also display them on the stores pages. |
Style/Size |
You can choose to display the product name, price, SKU, and description in different styles and sizes. Choose between plain, bold, italic, and typewriter styles, and between small, normal, and large sizes for each. |
Image Alignment |
For advanced users, product images can be displayed aligned to the center or to the right, in addition to the default left alignment. |
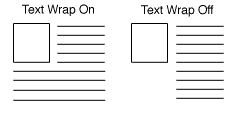
Text Wrap |
If this option is set to "on" and you have both text and a graphic for your product, the text will wrap around under the graphic, otherwise, it will continue in a straight column. You only need to enable this feature if your product description contains a lot of text.
|