The HTML Editor allows you to enter text and add formatting and layout visually, much like you would using Microsoft® Word. When you use the HTML Editor to edit text, the editor will automatically convert the visual formatting you apply into HTML. You can even create tables, add images, and include links using the toolbar at the top of the editor.
Because you are only editing the content of specific text fields, and not the entire HTML page, what you see in the editor won't be exactly like what you'll see on the final page. The final appearance and layout of the text will be influenced by the Store Theme or Custom Template used. Themes and templates usually focus on the overall appearance of a page, such as the location, alignment, colors, and font. When you are using the HTML Editor, you should pay most of your attention to the content specific formatting, such as paragraph blocking, text highlights (bold, underline, italics, etc.), lists, and tables. In other words, leave the default look up to the template, and concentrate on the exceptions.
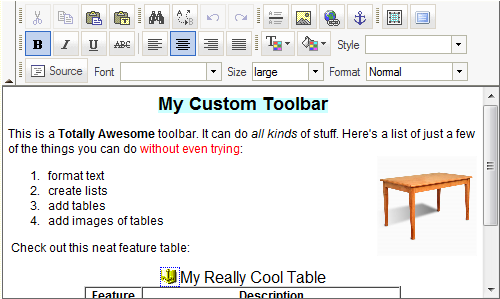
If you have Enabled the HTML Editor, text fields that can use the editor will have an [Editor] link above them. When you click the link, the editor will replace the default text entry box. Here's an example of the HTML Editor using the default toolbar:
At the top of the editor is the toolbar which has various tools to help you edit and format the contents of the field. The tool buttons are generally intuitive, and function like they would in Word. You can even use common keyboard shortcuts, such as Ctrl-C to copy, or Ctrl-B for bold. Each row of a toolbar stacks incrementally on top of the previous row. For example, Row 2 is found above Row 1, etc. You can create additional rows and add them to an existing toolbar or create a new toolbar, customized to fit your editing needs (see the HTML Editor Toolbar Editor help page for more information). The default tools on the Basic toolbar are (from left to right and top to bottom):
Row 3 |
|
| Cut * | Click this button or type Ctrl-X to remove the selected content to the clipboard. |
| Copy * | Click this button or type Ctrl-C to copy the selected content to the clipboard. |
| Paste * | Click this button or type Ctrl-V to insert the contents of the clipboard at position of the cursor. |
| Paste As Plain Text * | Click this button to insert the text from the clipboard without preserving any of the formatting. A pop-up window will open with a text field where you must paste the text (using Ctrl-V) to remove the formatting, then click OK to close the pop-up window and paste the unformatted text into the document at the position of the cursor. |
| Find | Click this button to search for text in the field. A pop-up window will open to allow you to enter the text you want to search for. |
| Replace | Click this button to search for text in the field and replace it with alternate text. |
| Undo | Click this button to undo your most recent changes. You can Configure how many undo steps the editor will keep. |
| Redo | Click this button to redo changes you've undone. |
| Insert Horizontal Line | Click this button to insert a horizonal line (<hr>) at the cursor. |
| Insert/Edit Image | Click this button to insert an image (<img>), or select an image and click this button to edit that image's properites. |
| Insert/Edit Link | Click this button to insert a link (<a>) to an HTML page or an anchor. |
| Insert/Edit Anchor | Click this button to insert an anchor point you can link to. |
| Select All | Click this button or type Ctrl-A to select all the contents of the editor field. |
| Maximize Editor | Click this button to maximize the HTML editor in your browser window. Click the button again to restore the normal screen view. |
* - Firefox has a security feature that prevents applications such as the HTML Editor buttons from accessing the clipboard. You can still use the keyboard shortcuts to copy, cut, and paste. There is also an article on the mozillaZine website about Granting JavaScript access to the clipboard. |
|
Row 2 |
|
| Bold | Click this button or type Ctrl-B to bold (<b>) the text you type. Click the button again to end bolding the text. You can also select text and click the button to bold the selected text. |
| Italic | Click this button or type Ctrl-I to italicize (<i>) the text you type. Click the button again to end italicizing the text. You can also select text and click the button to italicize the selected text. |
| Underline | Click this button or type Ctrl-U to underline (<u>) the text you type. Click the button again to end underlining the text. You can also select text and click the button to underline the selected text. |
| Strike Through | Click this button to strike out (<strike>) the text you type. Click the button again to end striking out the text. You can also select text and click the button to strike out the selected text. |
| Left Justify | Click this button to left-justify (align text to the left margin) the text you type. You can also select text and click the button to left-justify the selected text. |
| Center Justify | Click this button to center (align text to the center of the field) the text you type. You can also select text and click the button to center the selected text. |
| Right Justify | Click this button to right-justify (align text to the right margin) the text you type. You can also select text and click the button to right-justify the selected text. |
| Block Justify | Click this button to block-justify (align text to both margins) the text you type. You can also select text and click the button to block-justify the selected text. |
| Text Color | Click this button to change the text color. A color-selection menu will allow you to select the new text color. You can also select text and click this button to change the color of the selected text. |
| Background Color | Click this button to change the background color. A color-selection menu will allow you to select the new background color. You can also select text and click this button to change the background color for the selected text. |
| Style | Use this pull-down menu to select a pre-defined text style. There are several pre-defined styles to choose from. |
Row 1 |
|
| Source | Click this button to view or edit the (unformatted) HTML source. Click the button again to exit source view and return to the visual editor view. |
| Font | Use this pull-down menu to select a font to use for your text. Your theme already uses a default font, so selecting a font here will override the default for your page. The fonts available in the list are ones that are available on most computers. |
| Size | Use this pull-down menu to select a relative size for your text. Your theme already has a default font size, so selecting a size from this menu will either increase or decrease the font size. |
| Format | Use this pull-down to add common formatting, such as headers, to your text. |
|
ShopSite Help and Resource Center Last updated: March 01, 2010 Give Feedback |
 ShopSite Shopping Cart Software |