Create a Merchant User Account in Windows
In order for ShopSite to run on your Windows server with basic authentication (as opposed to ShopSite Login), you must create a Windows account and group for the store to run under. These instructions only apply to Windows Server 2003.
Overview
Follow these steps to create ShopSite merchant account in Microsoft Windows Server:
- Create a User Account for the Merchant
- Create a ShopSite Group and Add the Merchant Account
To add a user and group, start by opening the Computer Management window by clicking Start > Programs > Administrative Tools > Computer Management.
Create a User Account for the Merchant
Each merchant must have a unique Windows user account, and the account name must be the same as the store ID specified in the store.auth file:
- Open the Computer Management window by clicking Start > Programs > Administrative Tools > Computer Management.
- Click the plus (+) sign next to Local Users and Groups, then click the Users folder.
- Click the Action menu, then click New User....
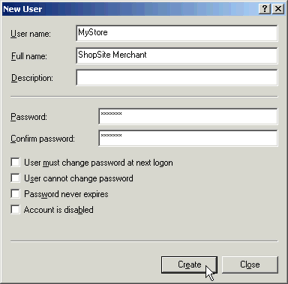
- Enter the username for the account. This should be the same as the StoreID in the store Auth file.
- Enter a password to use for the account. This account will be used by the merchant to login to the merchant back office. See Password Security Guidelines for help selecting a password.
- Fill in the other fields according to the policies for your server. Click Create, then click Close.
- By default, the new account will be a member of the "Users" group. If necessary, change the group membership of the account, according to the policies of your server. You will add this user to the "ShopSite" group in the steps below.
Create a ShopSite Group and Add the Merchant Account
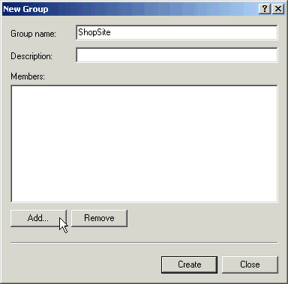
Create a ShopSite group, and assign the merchant account to the group.
- Click the plus (+) sign next to Local Users and Groups, then click the Groups folder.
- Click the Action menu, then click New Group....
- Enter
ShopSite as the group name.
- Optionally enter a description for the group.
- Click the Add button to assign the merchant user account to the group.
- Enter the username for the merchant account into the Enter Object names to Select field, then click Check Names. The workstation/user account name should appear in the box:
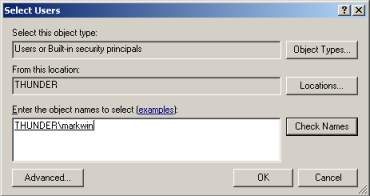
Click OK to add the user and return to the New Group screen.
- Verify that the merchant account name appears in the list of members, then click Create.
