Before you can use the HTML Editor, you must enable and configure it. If you aren't sure what a certain configuration option does, just leave it alone; the default settings will meet most merchant's needs. You can also view the effect of your configuration changes by using the example editor field at the bottom of this screen.
| HTML Editor feature |
Select the On radio button to enable the HTML Editor feature. This allows you to launch the HTML Editor to edit specific store fields. To disable the HTML editor, select the Off radio button. |
| Menu and Toolbar |
Use the pull-down menu to select which toolbar to display with the HTML editor. The default Basic toolbar contains most of the tools you are likely to use.
| Edit |
Click the Edit link to edit the tools available in the selected toolbar. The toolbar editor will open in a pop-up window. |
| Copy |
Click the Copy link to create a copy of the selected toolbar. A pop-up window will prompt you for a name for the new toolbar. Enter a name for the new toolbar and click Proceed to create the new toolbar. You can then use the toolbar editor to make changes to the tools available in the new toolbar. |
| Add |
Click the Add link to create a new toolbar from scratch. A pop-up window will prompt you for a name for the new toolbar. Enter a name for the new toolbar and click Proceed to create the new toolbar. The new toolbar will be created with no tools selected, and the toolbar editor will open in the pop-up window. |
| Rename |
Click the Rename link to change the name of the selected toolbar. A pop-up window will prompt you for a new name for the toolbar. Enter the new name and click Proceed to change the name of the toolbar. |
| Delete |
Click the Delete link to delete the selected toolbar and remove it from the list. A pop-up window will ask you to confirm the action. Click Proceed to delete the toolbar, or Cancel to retain the toolbar. |
|
Editor Behavior |
| Paste as plain text |
Check this box if you want the Paste function to remove any text formatting before inserting the text. If you leave this box unchecked, text formatting will be preserved when you insert text using the standard paste feature.
Note: |
How and if formatting is preserved in copied text depends on the program the text is copied from. The HTML Editor can only preserve formatting if the original text was copied from a program that included compatible formatting.
|
|
| Undo levels |
Enter the number of Undo steps the HTML Editor will remember. Each remembered undo step uses up memory, so if the HTML Editor is being unresponsive or slow, you may want to try reducing the number of undo steps to save. |
HTML Output
Select how the HTML Editor will interpret different keystrokes. |
| Enter key |
Select what HTML tag to insert when you hit Enter.
- <br> — The Enter key will start a new line, but will not end the current paragraph. If you select this option, the SHIFT + Enter key option will be disabled.
- <p> (default) — The Enter key will end the current paragraph and begin the next one.
- <div> — The Enter key will end the current paragraph and begin the next one, but the HTML Editor will use <div> tags to enclose paragraphs instead of the normal <p> tag.
|
| SHIFT + Enter key |
Select what HTML tag to insert when you hold down the Shift key when you press Enter. This option is disabled if you select <br> for the Enter key output.
- <br> (default) — Shift-Enter will start a new line, but will not end the current paragraph.
- <p> — Shift-Enter will end the current paragraph and begin the next one.
- <div> — Shift-Enter will end the current paragraph and begin the next one, but the HTML Editor will use <div> tags to enclose paragraphs instead of the normal <p> tag.
|
| Format source |
Check this box to have the HTML Editor display the HTML source in a reader-friendly format when you are in Source view. This will not alter the actual source, only the way it is displayed. |
| Format output |
Check this box to have the HTML Editor save the HTML source in a reader-friendly format. This will modify the way the source is saved and displayed, but will not alter the way the HTML output appears. |
| Encode HTML output |
Check this box to have the HTML Editor replace reserved HTML characters (such as &, >, <, etc.) with HTML Entities. This will replace any of your HTML markup (including anything generated by the HTML Editor) with characters that will be displayed instead of interpreted by a browser. Most merchants will want to leave this box unchecked. |
| Tab spaces |
Enter the number of non-breaking spaces ( ) to insert when you hit the Tab key. HTML normally treats any number of spaces, tabs, and line-feeds in the source as a single blank space when displaying it in a browser. The tag can be used to insert a single non-breaking space, or it can be used repeatedly to insert several spaces in a row. |
Editor Behavior |
| Show Borders |
Check this box to have the HTML Editor display table borders when editing a table, even if the borders will not be displayed in the final output. |
| Expand Toolbar |
Check this box to have the HTML Editor start with the toolbar expanded. If your toolbar is collapsible, un-checking this box will cause the HTML Editor to start with the toolbar collapsed. |
Textarea with Editor |
| Try it out |
Use this sample textarea to test the HTML Editor with your saved settings. See the HTML Editor help for a guide to using the HTML Editor.
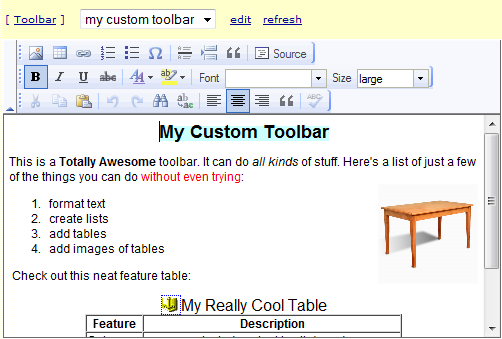
When you launch the HTML Editor, you will see a [Toolbar] link above the editor (see example below). When you click the link, you will be shown a pull-down menu with the available toolbars. Simply select the toolbar from the pull-down menu, and that toolbar will load in the editor. This allows you to create custom toolbars and test them without having to reload the page.
Bedside the toolbar pull-down is an Edit link, which will launch the toolbar editor to let you edit that toolbar. There is also a refresh link which will reload the editor (with the selected toolbar) and text field contents. |